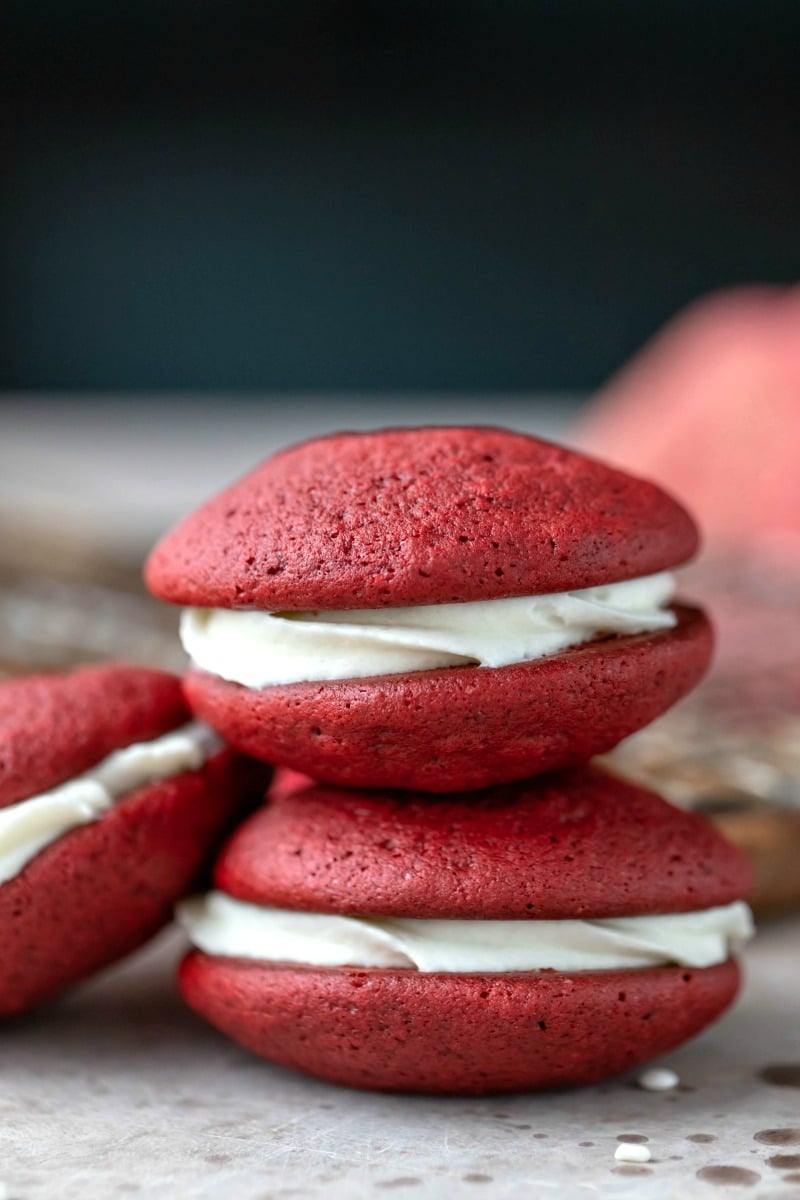
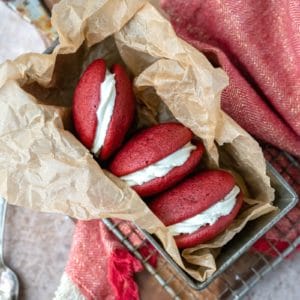
Red Velvet Whoopie Pies taste like red velvet cupcakes and are filled with either vanilla buttercream or cream cheese frosting. Great red velvet recipe!

Published 12/9/13. Updated with new tips and photos 12/1/18.
Lately, my son has been my buddy when I’m in the kitchen. He has been learning to measure ingredients, and he loves to drop the ingredients into the mixing bowl.
Since he’s been spending time baking with me, I try to make sure that there are some special treats that we make just for him.
There are two things that I know he always likes – chocolate/mint treats and anything red velvet. So, these Red Velvet Whoopie Pies were for him.
The red velvet cookies are soft and cakey, and you can either fill the cookies with whipped vanilla buttercream frosting or cream cheese frosting.
How to make red velvet whoopie pies (without cake mix)
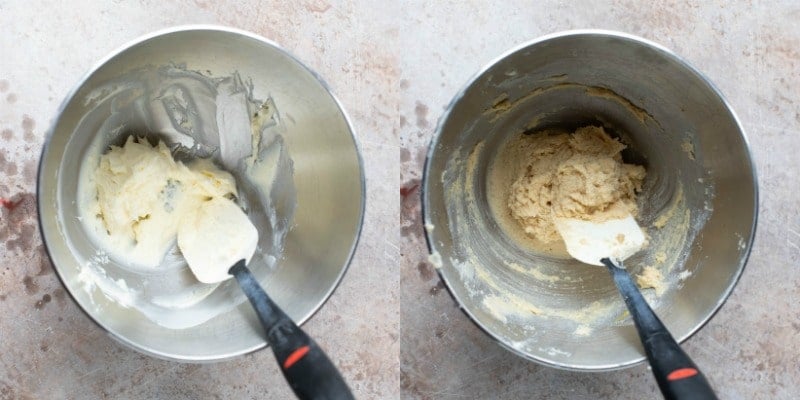
Begin by beating the butter. Then, add in the sugars, and beat until well-combined.

Next, mix in egg and vanilla. Then, alternate flour mixture with buttermilk, beginning and ending with flour mixture.

Finally, mix in red food color, scoop, and bake!
How to store
This recipe makes 1 dozen sandwich cookies, and they were gone shortly after we made them. If you’re lucky enough to have some leftover, store them covered in the fridge.
 More red velvet recipes!
 More red velvet recipes!
If you’ve tried this red velvet whoopie pie recipe, don’t forget to rate the recipe and leave me a comment below. I love to hear from people who’ve made my recipes! You can SUBSCRIBE to receive my latest recipe newsletters or FOLLOW ME on FACEBOOK, INSTAGRAM and PINTEREST for even more delicious food.

Red Velvet Whoopie Pies
Ingredients
- 2 cups all-purpose flour¹
- 3 tablespoons unsweetened cocoa powder
- ½ teaspoon baking soda
- ¼ teaspoon salt
- ½ cup butter at cool room temperature²
- ¾ cup granulated sugar
- ¼ cup brown sugar packed
- 1 large egg
- 1 teaspoon vanilla
- ½ cup buttermilk³
- 1 ounce bottle red food coloring⁴
- Whipped Buttercream Frosting
- Cream Cheese Frosting
Instructions
- Preheat oven to 375 F. Line 2 baking sheets with parchment or silicone baking mats. Set aside.
- In medium bowl whisk flour, cocoa powder, baking soda, and salt together; set aside.2 cups all-purpose flour¹, 3 tablespoons unsweetened cocoa powder, ½ teaspoon baking soda, ¼ teaspoon salt
- In large mixing bowl beat butter on medium for 30 seconds.½ cup butter
- Add in the sugars, and beat until well-combined.¾ cup granulated sugar, ¼ cup brown sugar
- Beat in egg and vanilla.1 large egg, 1 teaspoon vanilla
- Alternate adding flour mixture and buttermilk, mixing after each addition just until combined. Stir in food coloring.½ cup buttermilk³, 1 ounce bottle red food coloring⁴
- Scoop out 1.5 tablespoons batter, spacing cookies about 2 inches apart on prepared baking sheets.
- Bake 7-12 minutes, or until cookies are set.
- Let cool 5 minutes on baking sheet.
- Remove to wire rack to finish cooling.
- Top cooled cookie with vanilla buttercream or cream cheese frosting, and then place another cookie on top.Whipped Buttercream Frosting, Cream Cheese Frosting
- Cover and refrigerate any leftovers.
Notes
- Be sure to measure the flour properly by either weighing the flour or by aerating the flour, spooning it into your measuring cup, and then leveling.
- The butter is at cool room temperature if you can dent it when you press on it, but the butter holds its shape otherwise. You don't want to use warm butter in this recipe.
- Regular or low-fat ok.
- Or 2 tablespoons red food color.
- Nutrition values are estimates. Nutrition information for 1 serving is for 2 cookies without frosting.
Nutrition
Did You Make This Recipe?
Share it with me on Instagram @i_heart_eating and follow on Youtube @katedean and Pinterest @katedean for more!
Reader Interactions
Love this recipe?
Share your thoughts below and let’s chat! Make sure to connect with me on your favorite social platform below and show me what you made!


Comments & Reviews
Tammy says
Can you substitute the red food coloring for Red velvet emulsion flavoring? Just wondering since it’s used in a lot of cookies and cake recipes.
Kate says
Hi! I haven’t tried that in this recipe, but I’ve used red velvet emulsion with coloring in other recipes, and it has worked well.
mm says
I am so glad that I chose your recipe. they came out perfect. So moist and yummy.
Kate says
Thank you!
Steven C says
I made these tonight and they turned out great. I filled then brown butter cream cheese frosting. 5/5 Will make again!
Kate says
Thank you!
Carly says
These looked so good I had to try them. They tasted as good as they looked. I did leave the food coloring out since I didn’t have any, guess they were just velvet whoopie pies. ;)
Kate says
Thank you! Yes! The food coloring just adds color anyway. Thanks for commenting!
Karly says
These looks so yummy!
Kate says
Thank you!
Caroline says
Yum!
Kate says
Thanks so much! =)
Gloria // Simply Gloria says
I love having my boys in the kitchen, too. In fact, my oldest is THE cook with all of his roommates. And, my teenager actually knows how to do what most adults don’t know in the kitchen.
Love red velvet…especially with the filling you created with them! Yay! on the vanilla bean. Love this whole recipe, Kate!
Marie Shanahan says
I love this. :) Thanks so much!
Brandi says
Oh my, these look delicious! Thank you so much for sharing…these are perfect for the holidays! Brandi from Collective Bias
Kate says
Thanks so much!! =)
Shareba from In Search Of Yummy-ness says
I love cream cheese frosting! Thanks for sharing this recipe!
Kate says
I’m not that into frosting, but you just can’t go wrong with cream cheese frosting on anything! =)