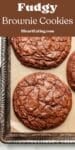
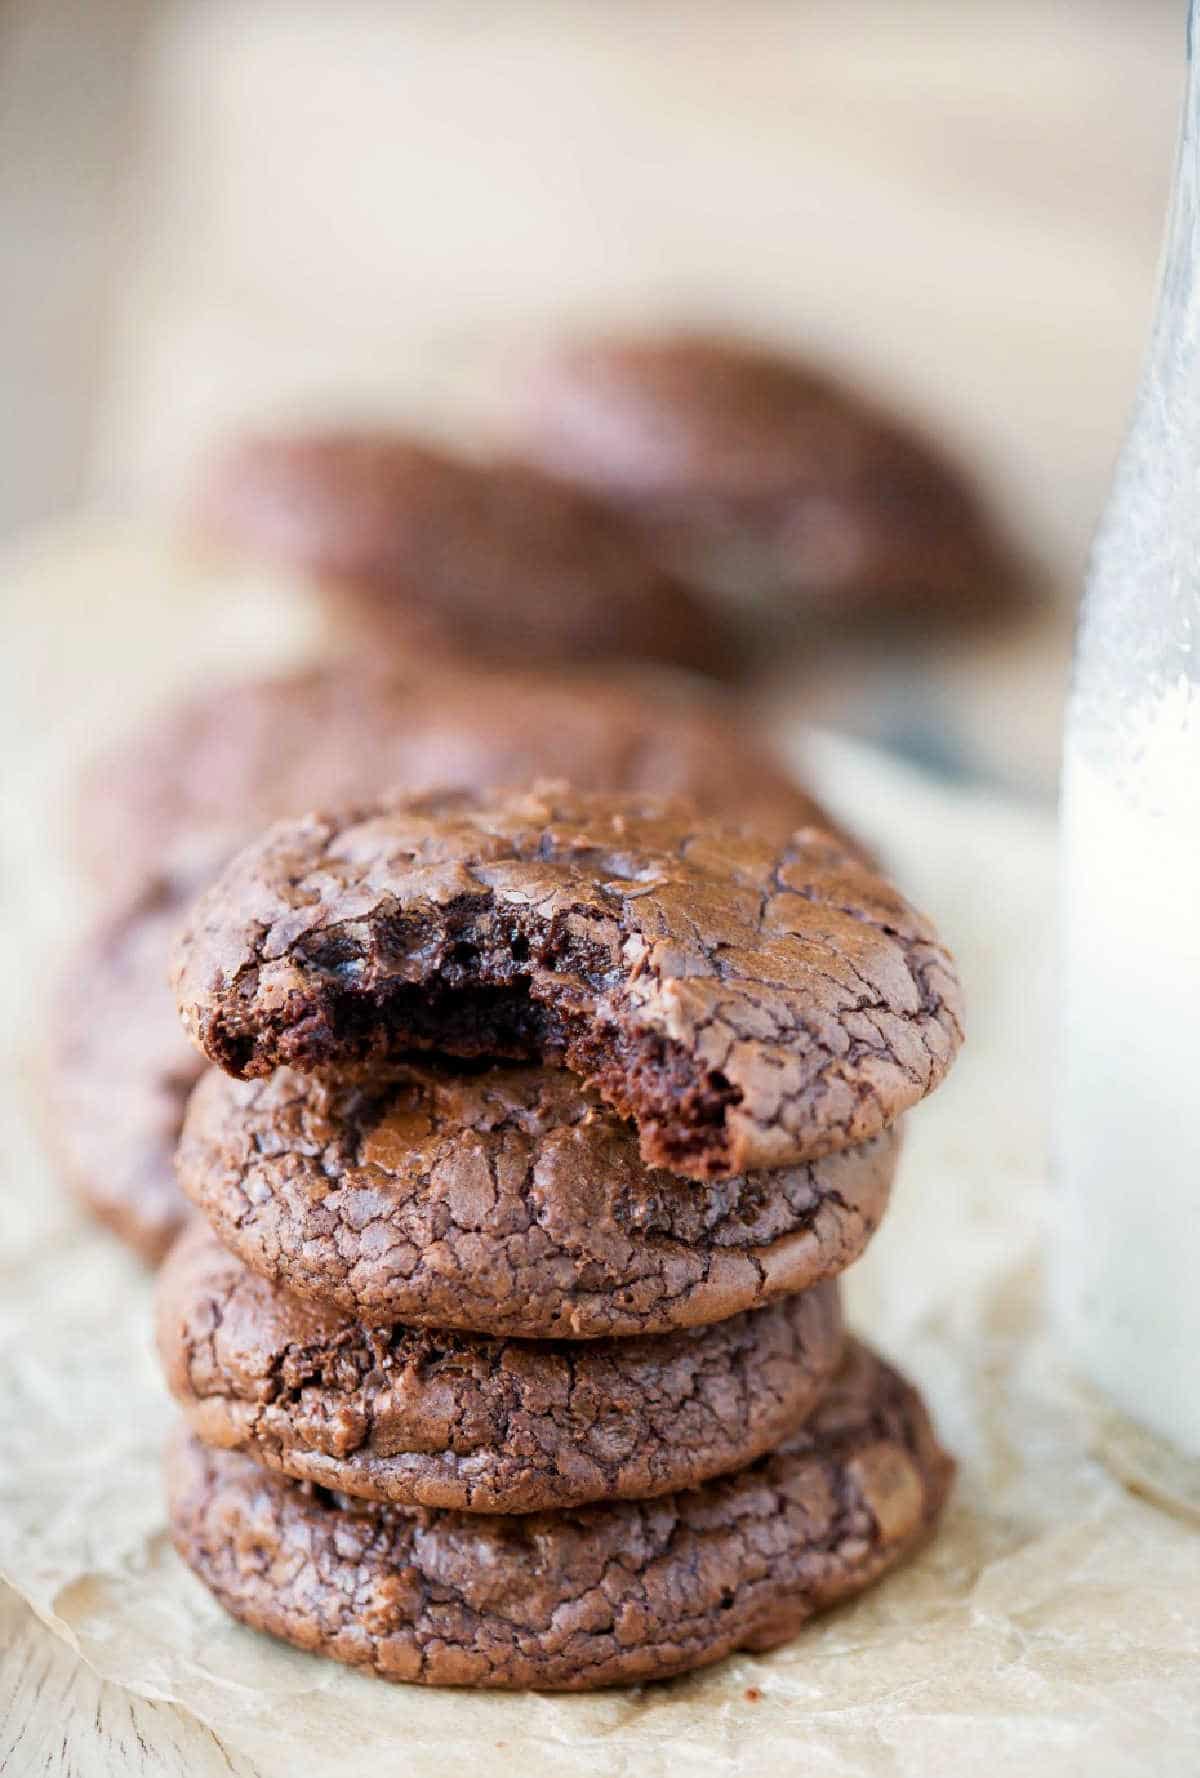
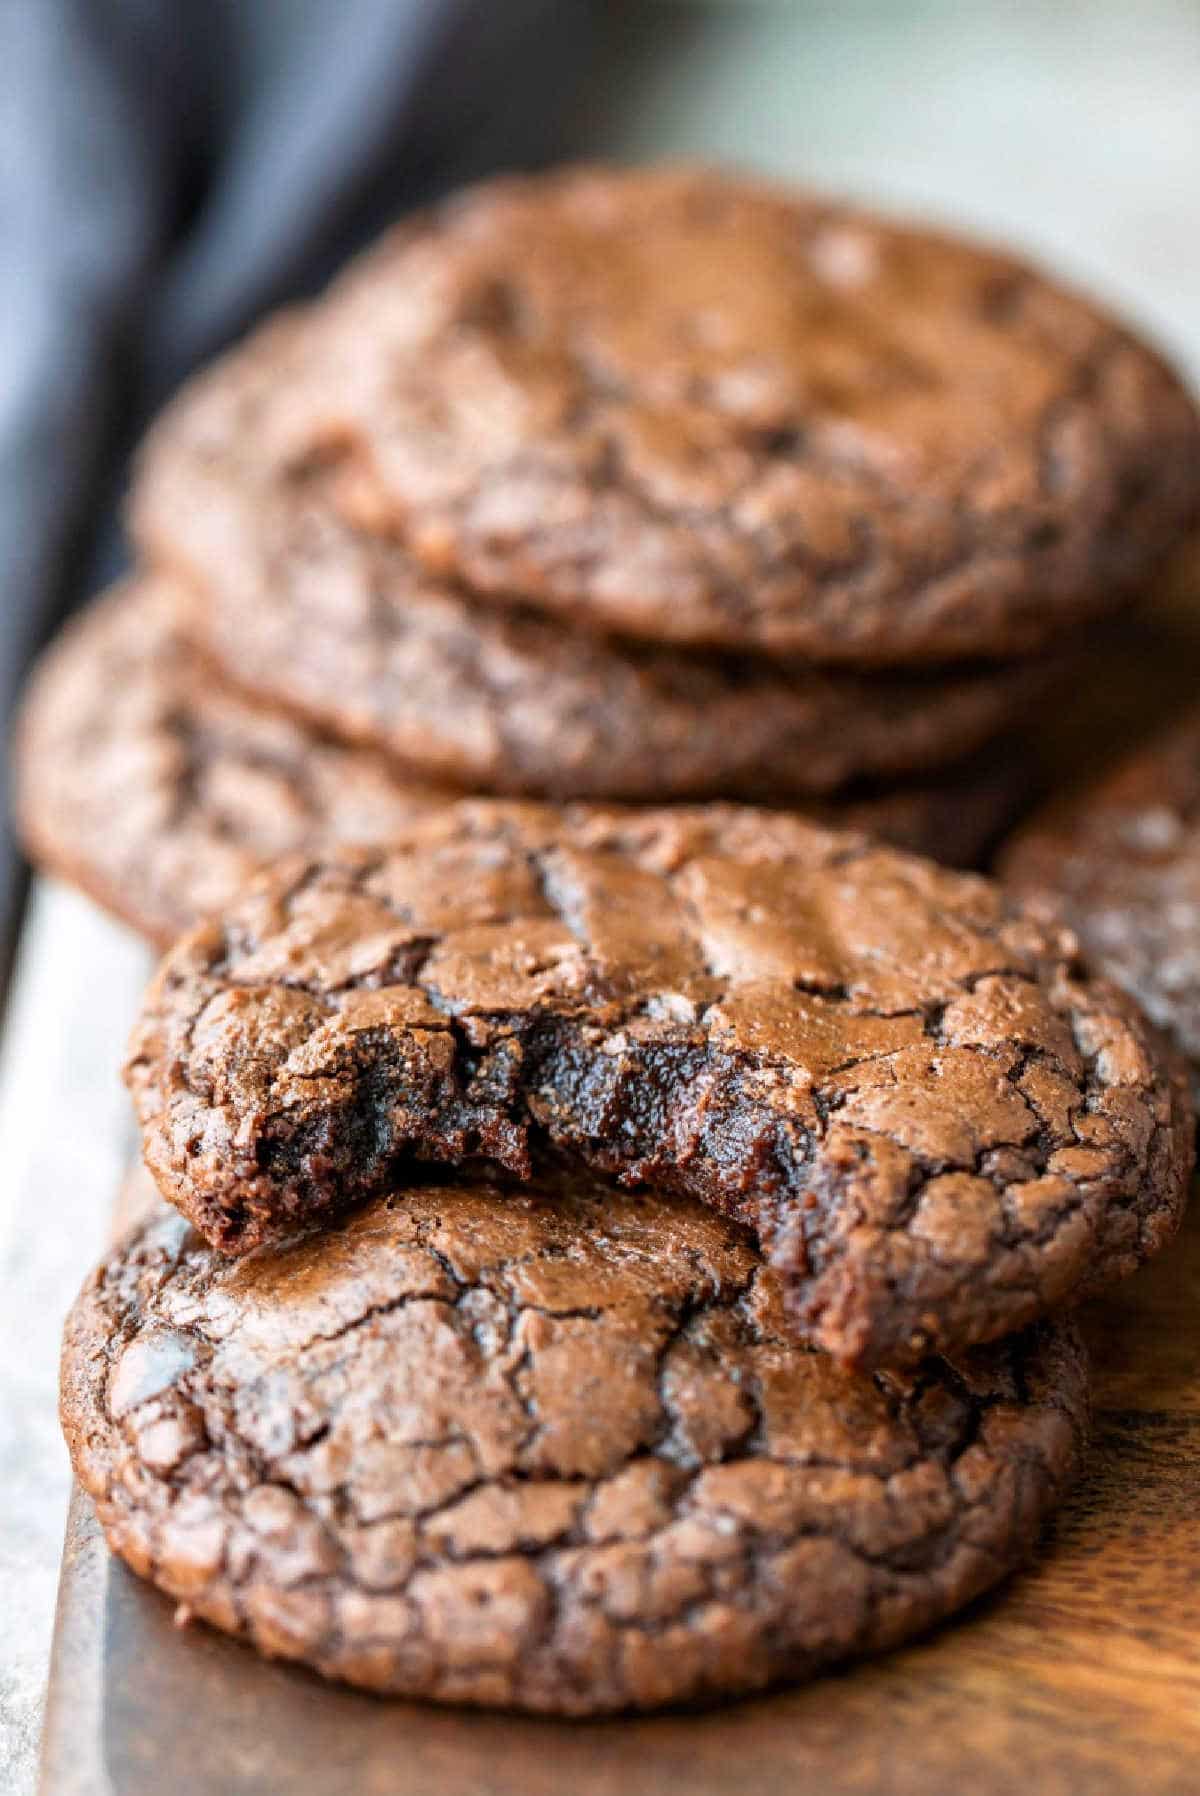
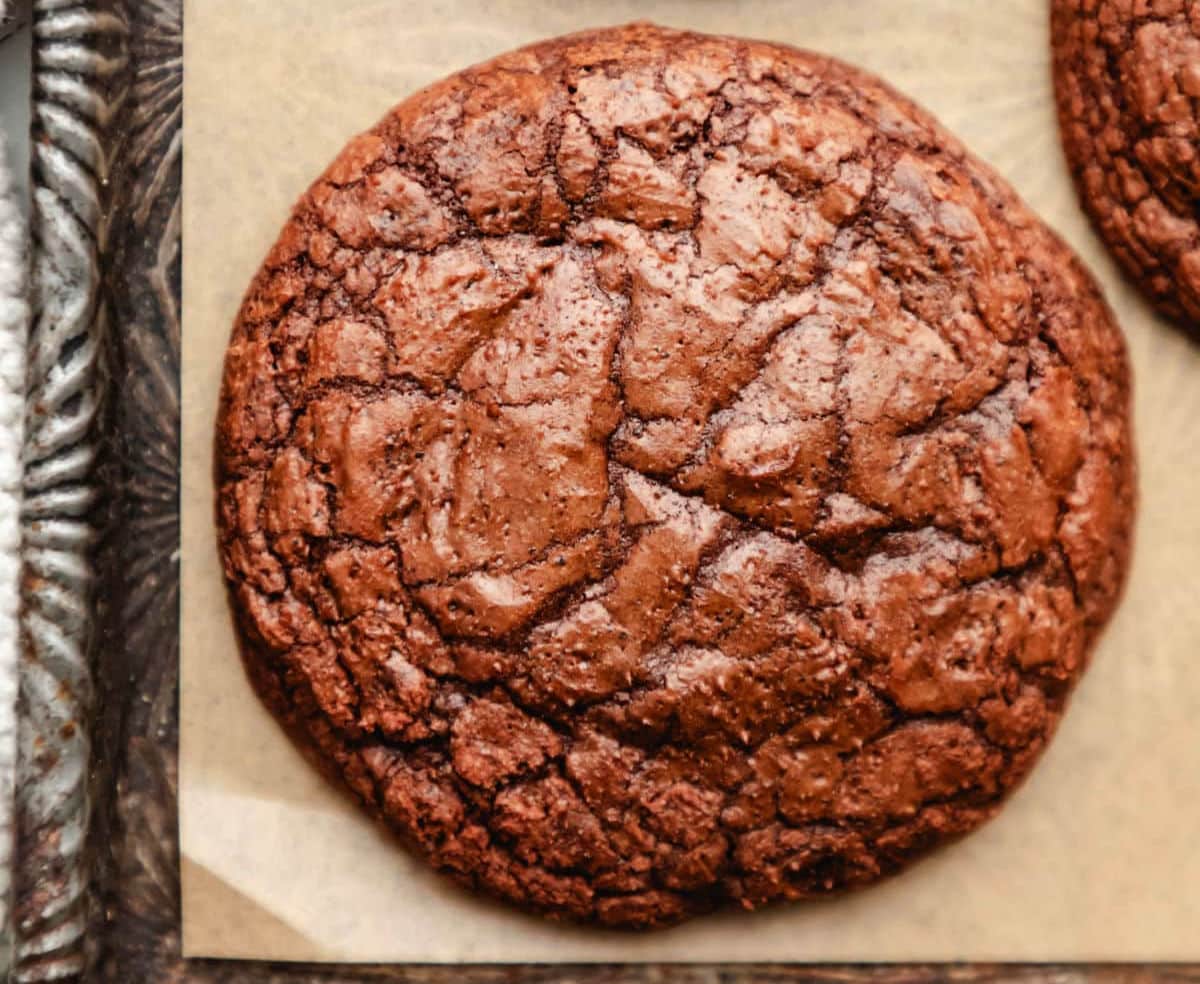
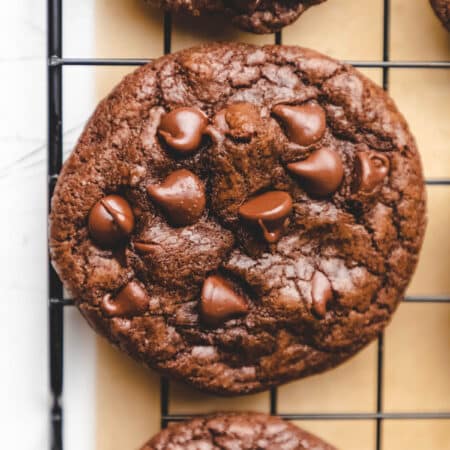
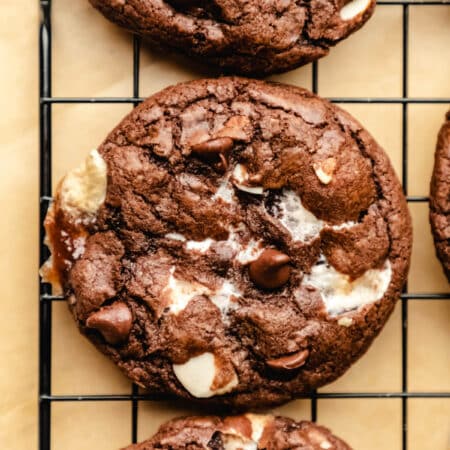
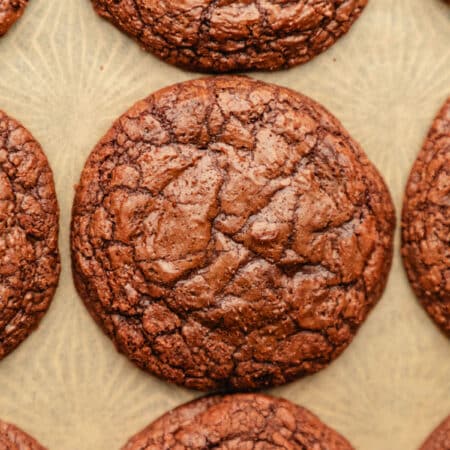
Fudgy brownie cookies with crackly tops and chewy edges — these rich chocolate cookies deliver all the best parts of a brownie in a soft, decadent cookie. This easy homemade recipe creates intensely chocolatey cookies everyone will love.
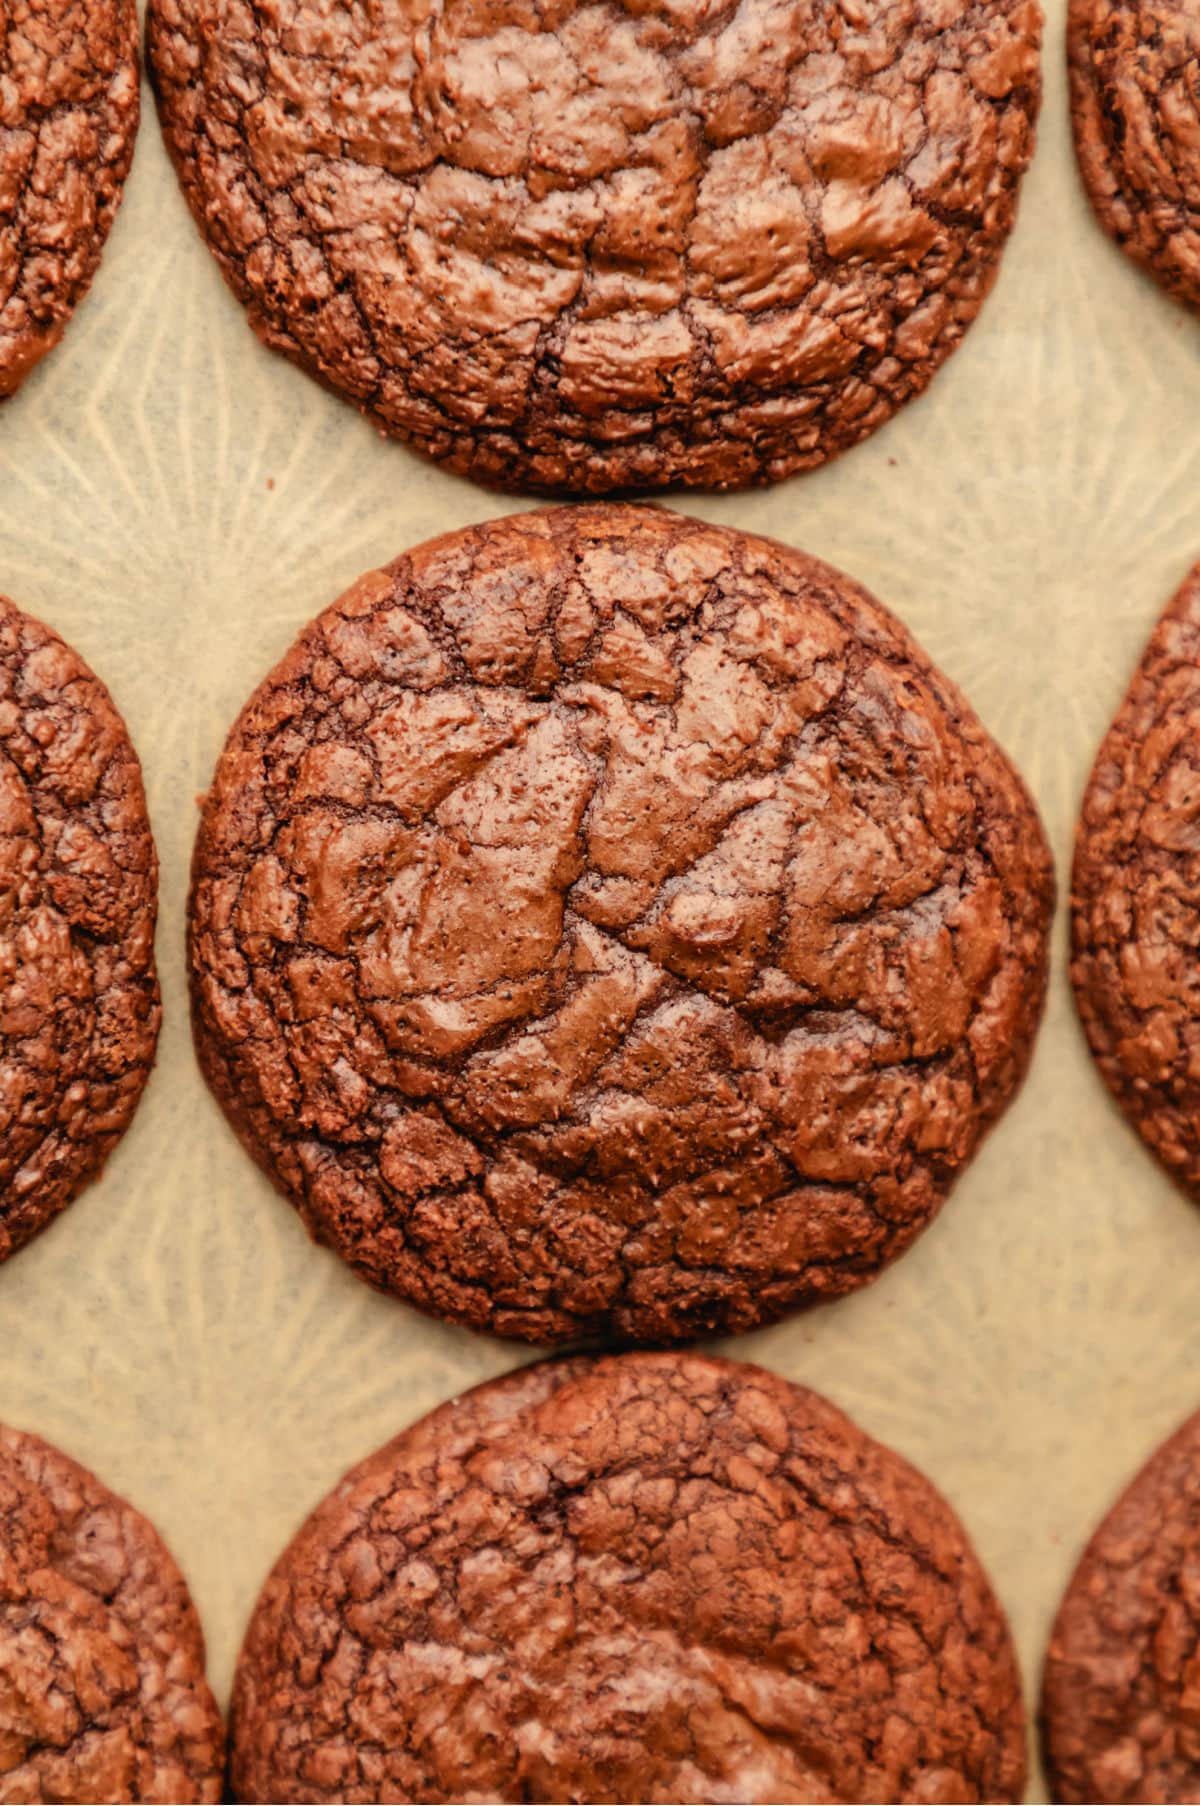
These fudgy brownie cookies have shiny, crackly tops, chewy edges, and rich chocolate centers — just like the best homemade brownies, but in cookie form. After testing different chill times and baking methods, this version delivers thick, soft cookies with deep chocolate flavor every time.
They’re similar to my popular flourless fudge cookies, but these cookies bake up thicker and richer with an even more intense chocolate taste.
“I found this recipe on Pinterest about 5-6 years ago, and I have made them so many times. They’re the perfect chocolate chewy delicious cookie. I always add a little bit of sea salt on top, and they’re so good!! Thank you so much for the recipe!” – Melanie
Ingredient notes and substitutions
- Butter: I use salted butter. If using unsalted butter, increase the salt by about 1/4 teaspoon.
- Cocoa Powder: I didn’t have good results when using Dutch process cocoa powder. I recommend using unsweetened cocoa powder in this recipe.
- Chocolate chips: I’ve tried making the cookies without the mini chocolate chips, and they didn’t have as much of a crackly crust. Don’t skip the mini chocolate chips if you want shinier cookies.
How to make brownie cookies
When you read the recipe, you may be tempted to cut short the mixing time. Please don’t do it! One of the keys to success is to follow the instructions as-written.
The cookies need the extended mixing time. It’s going to make all the difference in your cookies turning out right. So please take the few extra minutes to make it as written.
Step 1: Line your baking sheets with either parchment paper or a silicone baking mat. Set aside.
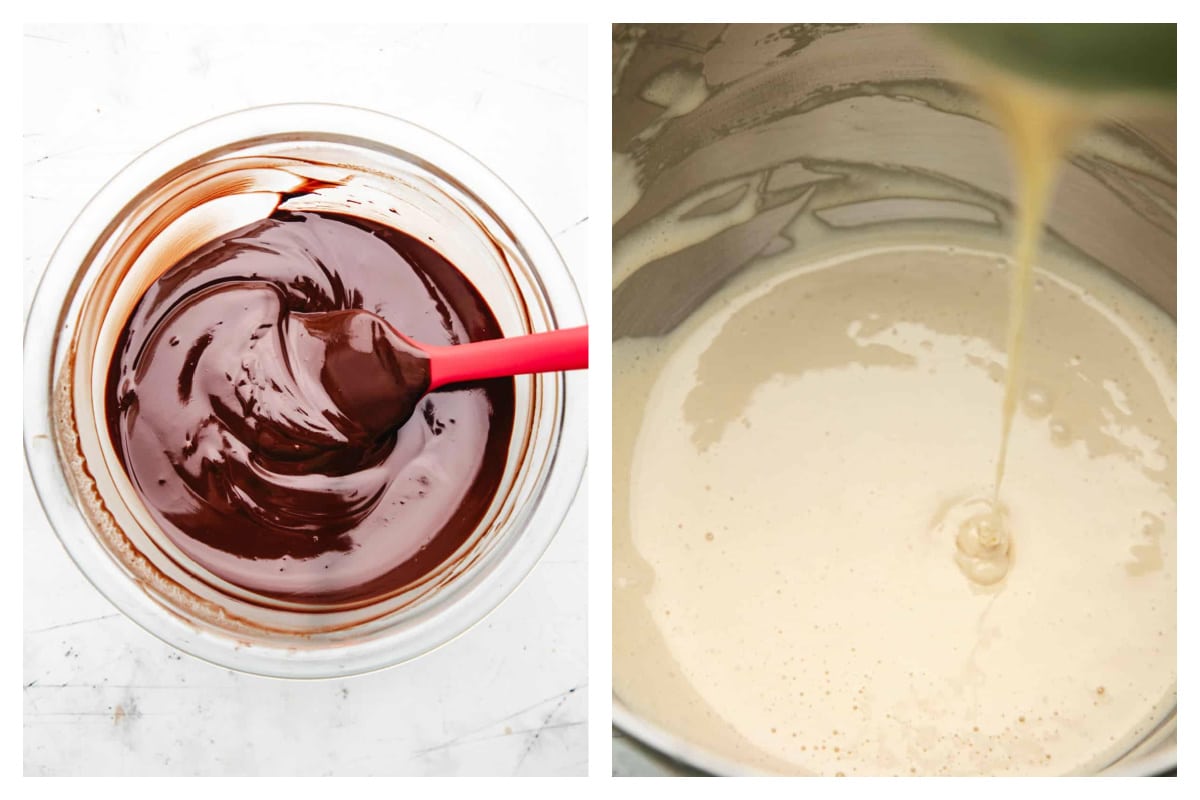
Step 2: Melt the bittersweet chocolate chips and butter in a heavy saucepan over low, stirring constantly, until melted and combined. Remove from heat and set aside.
Step 3: In the bowl of a stand mixer fitted with a paddle attachment, beat the eggs, brown sugar, granulated sugar (white sugar) vanilla, baking powder, and salt on high for 5 minutes, or until the batter is thick and creamy. The batter should fall in ribbons at this point. Tip >> Don’t cut this step short! The cookies will be too thin and won’t have the shiny exterior if you cut the mixing short.
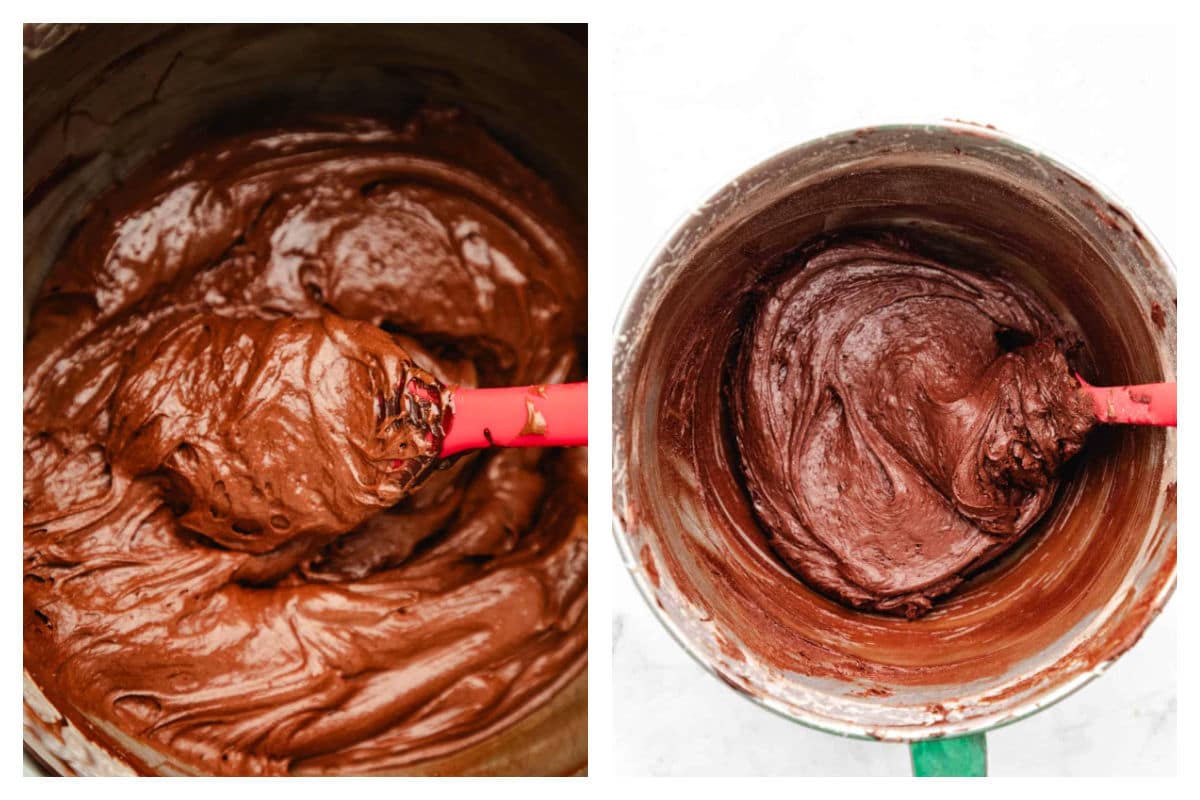
Step 4: Reduce the mixer speed to low and stream in the melted chocolate mixture.
Step 5: Stir in the flour and cocoa powder just until combined.
Step 6: Fold in the mini chocolate chips and nuts, if using. The dough should be thick like brownie batter at this point.
Step 7: Cover and chill the dough for 30 minutes.
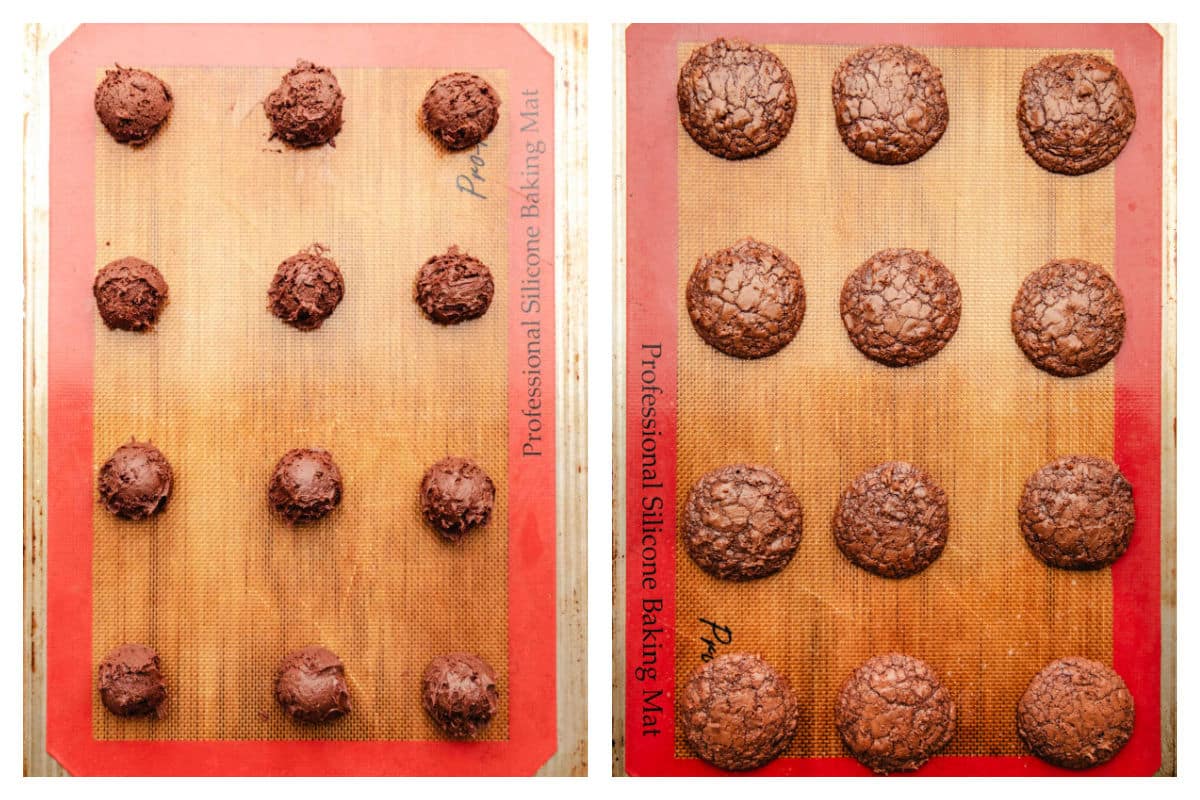
Step 8: Scoop out 1.5 tablespoon scoops of dough (medium cookie scoop). Place the scoops of dough about 2 inches apart on the prepared baking sheets.
Step 9: Bake for about 8-10 minutes. The middles should look soft and a little underdone but the edges should be set. Tip >> Since oven temps can vary, you may find that you need to increase the baking time.
Step 10: Once the cookies have cooled, remove from the cookie sheet to a wire rack or plate.
Recipe Tips!
- Melting: You can also melt the chocolate chips and butter in a microwave-safe bowl. Microwave for 30 seconds, and then stir. Continue microwaving in 15 second intervals and then stirring until melted and well-combined.
- Mixing: I recommend using a paddle attachment to mix the cookie dough. I’ve tried using a whisk attachment, and the cookies didn’t turn out as well.
- Chilling: The cookies will be flat and will bake out if you skip chilling the dough. Also, if your refrigerator is packed doesn’t chill very well, you may find that you need to add a little extra time to the given chilling time.
- Baking: The cookies will look underbaked in the center but be set at the edges, and the crackly, shiny crust will develop as the cookies cool.
- Chocolate flavor: You can add 1 teaspoon of espresso powder for more intense chocolate flavor.
Troubleshooting flat cookies
There are two things that could cause flat cookies.
First, cutting the mixing time short or using a hand mixer/electric mixer (or mixing by hand). The volume of air that a stand mixer can beat in gives the cookies lift.
If using a hand mixer, you’ll need to add additional mixing time. I’ve heard from several people who added about 5 minutes of additional time when using a hand mixer. They’ve said that that helped to incorporate enough air.
Second, the other thing that can cause flat cookies is not adequately chilling the dough. For me, 30 minutes of chill time works well.
However, you may find that you need to add additional chilling time. Factors like the temperature that your fridge is set to, how well it chills, and even how full your fridge is can affect how long the dough will need to chill.
Recipe FAQs
This recipe has over 1,000 comments and questions. I’ve taken a few of the most common questions and have answered them here.
I’ve used bittersweet chocolate chips and semisweet chocolate chips to make the cookies. Both have worked well.
I’ve frozen the dough in scoops and have baked the dough from frozen. While I do add more time when baking from frozen, otherwise, I’ve had good luck with baking the frozen dough.
I’ve made the cookies in 1.5 tablespoon, 2 tablespoon, and 4 tablespoon (1/4 cup) scoops. All three of those sized cookies are pictured here. 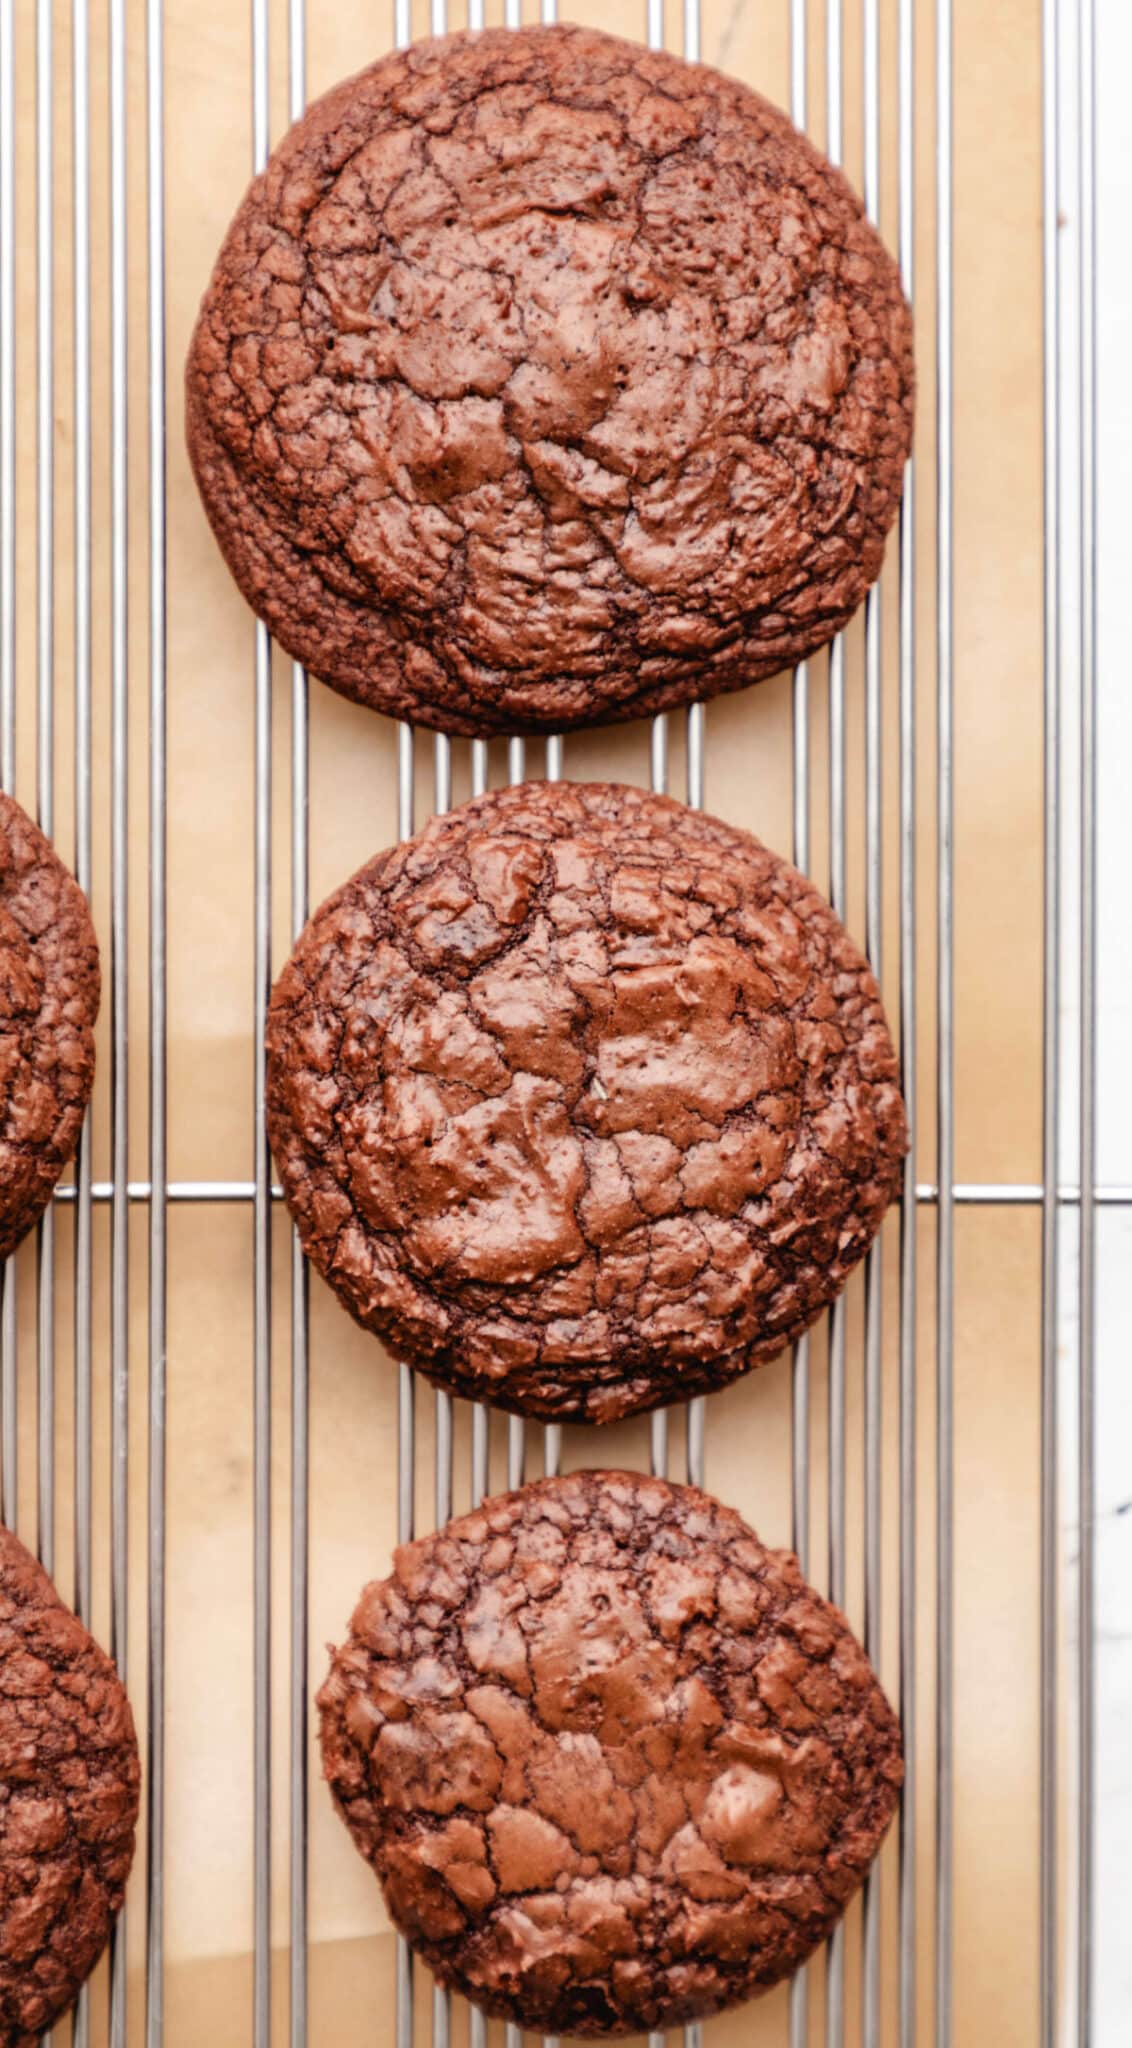
Storage
Store any leftover brownie cookies in an airtight container at room temperature. The cookies will keep for up to 3 days when properly stored.
More popular cookie recipes!
If you’ve tried this brownie cookie cookie recipe, don’t forget to rate the recipe and leave me a comment below. I love to hear from people who’ve made my recipes!
You can subscribe to receive my latest recipe newsletters or follow me on Facebook, Instagram, Pinterest, YouTube, or TikTok for even more delicious food.

Brownie Cookie Recipe
Ingredients
- 12 ounces bittersweet chocolate chips 60-70% cacao
- ½ cup butter
- 3 large eggs
- 1 cup granulated sugar
- ¼ cup light brown sugar
- 1 tablespoon vanilla extract
- ½ teaspoon baking powder
- ½ teaspoon salt
- ¾ cup all-purpose flour
- ¼ cup unsweetened cocoa powder¹
- 1 cup pecans chopped, optional
- ½ cup mini semisweet chocolate chips
Instructions
- Melt bittersweet chocolate chips and butter in a heavy saucepan over low heat, stirring constantly until melted and well-combined.12 ounces bittersweet chocolate chips, ½ cup butter
- Remove from heat, and set aside.
- In the bowl of a stand mixer fitted with a paddle attachment, beat the eggs, sugars, vanilla, baking powder, and salt on high speed 5 minutes, or until the batter is thick and creamy. This step is key, so make sure to beat the mixture for the full 5 minutes.3 large eggs, 1 cup granulated sugar, ¼ cup light brown sugar, 1 tablespoon vanilla extract, ½ teaspoon baking powder, ½ teaspoon salt
- Reduce the speed to low, and mix in the melted chocolate until well-combined.
- Stir in flour and cocoa powder just until combined.¾ cup all-purpose flour, ¼ cup unsweetened cocoa powder¹
- Add nuts, if using, and mini chocolate chips. Stir in to combine. The batter should be the consistency of a thick brownie batter at this point.1 cup pecans, ½ cup mini semisweet chocolate chips
- Cover the batter, and chill for 30 minutes.
- Preheat oven to 350 F. Line two baking sheets with parchment paper.
- Using a 1.5 tablespoon cookie scoop, drop batter onto the prepared cookie sheets about 2 inches apart.
- Bake cookies 8-10 minutes. The cookie will look set at the edges but still be a little wet looking in the center. Don’t overbake, or the cookies won’t be crackly and fudgy.
- The shiny, crackly crust will develop as the cookies cool on the baking sheet.
Video
Notes
- Butter: I use salted butter. If using unsalted butter, increase the salt by about 1/4 teaspoon.
- Cocoa Powder: I didn’t have good results when using Dutch process cocoa powder. I recommend using unsweetened cocoa powder in this recipe.
- Chocolate chips: I’ve tried making the cookies without the mini chocolate chips, and they didn’t have as much of a crackly crust. Don’t skip the mini chocolate chips if you want shinier cookies.
- Nutrition facts are estimated.
Nutrition
Did You Make This Recipe?
Share it with me on Instagram @i_heart_eating and follow on Youtube @katedean and Pinterest @katedean for more!
Adapted from Everyday Dishes.
Reader Interactions
Love this recipe?
Share your thoughts below and let’s chat! Make sure to connect with me on your favorite social platform below and show me what you made!


Comments & Reviews
Kerry says
Can I leave the batter to chill overnight in the fridge?
I have made these before and my husband and I absolutely love them! They are delicious thank you so much:)
Kate says
Hi! I’m so glad that you two like them! I haven’t had any issues with leaving the dough, but I’ve heard from some people who have said that the dough set up so much in the fridge that they had trouble working with it.
Chantal says
I only have 6oz of chocolate to melt, how could I split this recipe in half?
Kate says
If you’re weighing your ingredients, it will be far easier to halve the recipe. You can hover over the “36” for the serving size, and a slider will appear. Adjust that to “18” and then click on “metric” just below the ingredients. That will give you the weights. For the half egg of an egg, whisk the yolk and white together, then divide the whisked egg mixture in half.
Marsha Morrow says
Mine doesn’t look like the picture but boy are they good! Mine were a little lumpy and odd shaped after cooking but it didn’t seem to affect the flavor! I chilled the dough for about 3-4 hours and found the dough to be very solid. I don’t know if chilling the dough that long made the difference in consistency but I thought it was going to be a little softer than it was. I did dip my scoop in water between to help with portioning the dough and to keep it from sticking to the scoop.
Kate says
Thanks for sharing your experience! I’m glad you liked the cookies! =)
Lindsey Haworth says
Will I ruin these if I don’t have parchment paper?
Kate says
The parchment paper helps the cookies not to stick. Do you have silicone baking mats or something similiar?
Fatimah khalid says
made them just now they were delicious! coffee taste was a bit much for my taste. but the texture was amazing
by the way, I used brown sugar instead because I wanted chewier cookies. will try them with regular sugar next time
Kate says
I’m glad that you liked them, but I’m confused about the coffee taste. There’s no coffee in the recipe. =)
Taylor says
LOL, I am baking these for the first time right now (2 minutes remaining) and just reading all the great comments and got to this one and for a moment thought, OMG I’ve screwed it up! Of course I’m very happy to see your reply before I even went to see how I missed the coffee!!
Kate says
I’m glad! Hope you enjoy the cookies! =)
Shelly B says
This is my second time baking these cookies this month. My kids LOVED them. They are so good. I’m not a huge brownie fan but these cookies are perfect! Thank you for sharing your recipe! I’ll definitely be following you to see what other yummy treasures you have!
Kate says
Thank you so much! I really appreciate that! =)
Beah says
Hi! Can this dough be made ahead of time?
Kate says
The dough can be frozen in scoops and then baked as directed. You’ll probably need to add a few more minutes to the baking time.
Christine says
These cookies should be illegal! Oh my goodness! Although I’m a sugar junkie, I’m not a fan of anything chocolate so thought this recipe would be a safe bet for me. My family would really love them but they’d be somewhat easy for me to ignore. Completely wrong! My family loves them. I keep them in the freezer and can’t keep my paws off eating them frozen! Oooohhhh the texture. I’m definitely making another batch asap. I’m wondering if the recipe could be doubled and if the dough can be frozen.
Kate says
Thank you so much!! I second that! I love cookies straight from the freezer! =)
Leah says
Hi, thank you so much! These were delicious! I ended up using Bisquick’s gluten free flour mix and using a bit less chocolate but they tasted amazing! Everyone loves them and couldn’t believe the cookies are gluten free!
Kate says
Thank you so much! And thank you for sharing that! I appreciate hearing about subs that work well.
Linsey says
for some reason these took about half an hour at 350 for me to get to the point where it wasn’t just a pile of goo, even after setting for a few minutes. they turned out good, but I’m not sure why it took so much longer than expected
Kate says
Hi! It sounds like it was an oven issue. If your oven cooks low, you might need to increase the temp. Hope that helps!
Rebecca says
Have you tried this with almond or coconut flour? Just curious on how it turned out, and any additional ingredients.
Kate says
No, I haven’t tried these with almond or coconut flour. So I can’t say for certain what changes would need to be made.
Kelly says
Hi! I want to make this recipe but I was wondering if you’re supposed to use light brown sugar or dark brown sugar because I only have dark brown.
Kate says
Hi! I use light brown because that’s what I keep more of on hand. I don’t see any reason why you couldn’t use dark brown with these cookies.
Maggie says
For some reason, mine did not turn out like the pictures. I followed your recipe exactly, and they turned out flat. Tasty, but flat. The only thing I didn’t do was add the mini chocolate chips. I’m at 7,000 feet, could this be an issue? Thanks!
Kate says
Hi! With high altitude baking, you usually need to made additional changes to a recipe. The most common changes are additional flour and leavening. Maybe that would help for next time!
Kim says
so good! And a beautiful shine and crackle!
Kate says
Thank you so much!!
Amy says
My cookies didn’t have the cracking effect on the top layer, but it tasted amazing. Instead of a stand mixer, I used my hand mixer to beat the ingredients and it didn’t turn out creamy and thick. I think I incorporated too much air into the batter which caused it to not have the cracked look in the end. I initially put in my cookies for 9 mins at 350 degrees but had to add like 3 more minutes because I didn’t see the cracked look. It was just completely smooth on the top. I surprisingly didn’t overcook it and it’s still soft on the inside and kinda crispy.
Kate says
Hi! I’m happy to help you troubleshoot for next time. Since you’re using a hand mixer, you’ll need to increase the amount of time that you beat the egg mixture because a hand mixer doesn’t have the same power as a stand mixer. There’s a photo of the egg mixture in the post so you can see what it should look like. Also, when you add the dry ingredients, you’ll want to stir the flour and cocoa powder in by hand to avoid overworking the dough. Also, there’s a note says that the crust will develop as the cookies cool, so there’s no need to continue to bake them past the normal baking time. If you have any other questions, please feel free to ask!
Malene says
My boyfriend wanted Corona-Comfort-Cookies so I found this recipe here on pinterest. It’s almost ridiculous how good they are. Especially considering how easy they are to make. I made one batch, but I now know that wasn’t enough.
PS. I might have posted this twice. If that is the case I apologise.
Kate says
I’m so glad that they were a hit! =) Thanks for commenting!
Malene says
My boyfriend wanted Corona-Comfort-Cookies, so I found this recipe here on pinterest. It’s almost ridiculous how good they are. Especially considering how easy they are to make. I made one batch, but I now know that was not enough.
Lindsay says
Hi! I used 12oz of chocolate and 1/2 butter. It was very thick when I finished melting it together. More like a paste and not a sauce. Is this correct ?
Kate says
Hi No, it should be thin – similar to a chocolate syrup consistency.
Abbey says
These cookies were delicious! BUT, mine did not spread out and develop a nice cookie shape like the picture shown. I chilled them for right at 30 minutes. Maybe my refrigerator is too cold? Or, I’m also wondering, maybe my chocolate and butter combination wasn’t “melty” enough to start. Thoughts? Would love to make these again and have them look as good as they taste!
Kate says
Hi! I’m happy to help you troubleshoot. Were your butter and chocolate completely melted and combined? Did they get the shiny crust but just didn’t spread?
michelle says
These were simple and delicious! used a double boiler for the chocolate and butter. thumbs up all around!
Kate says
Yay!! I’m so glad that the cookies were a hit! Thanks for commenting! =)