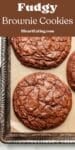
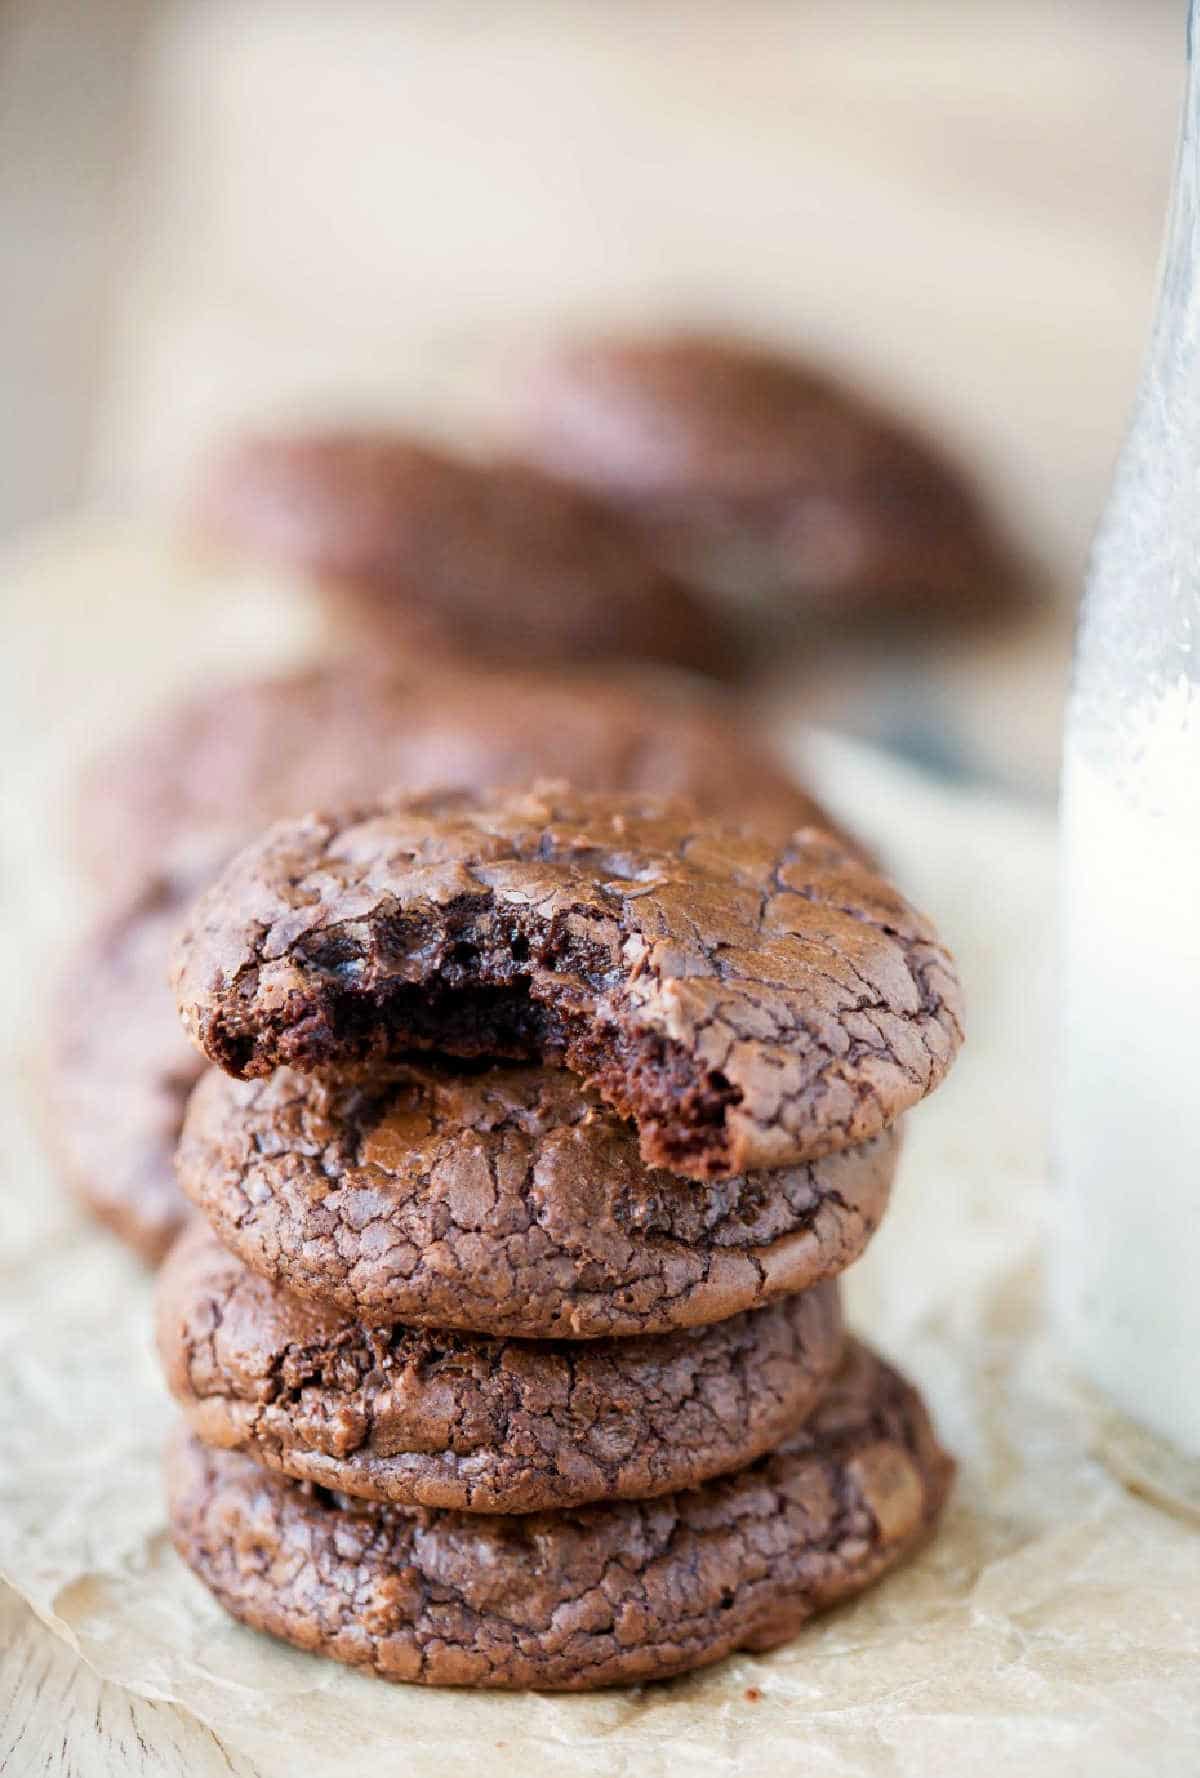
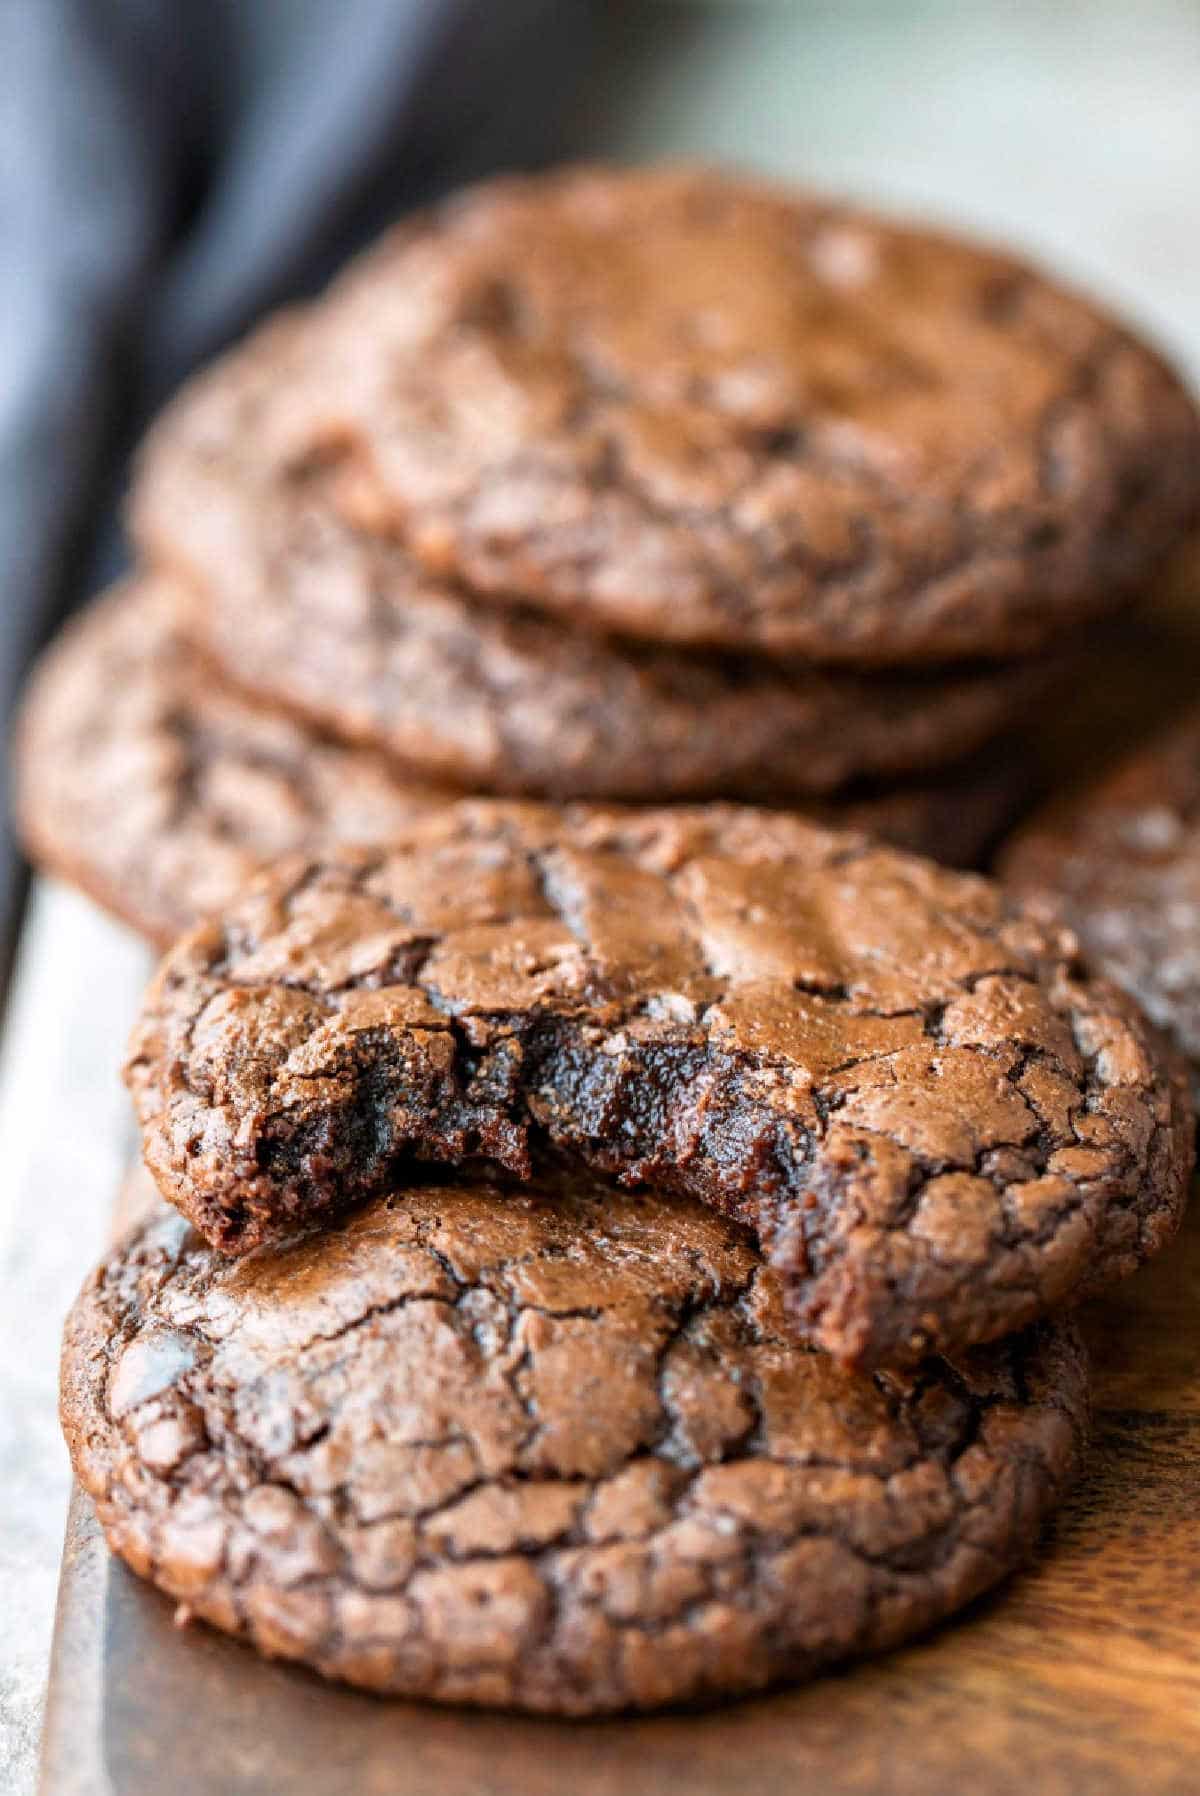
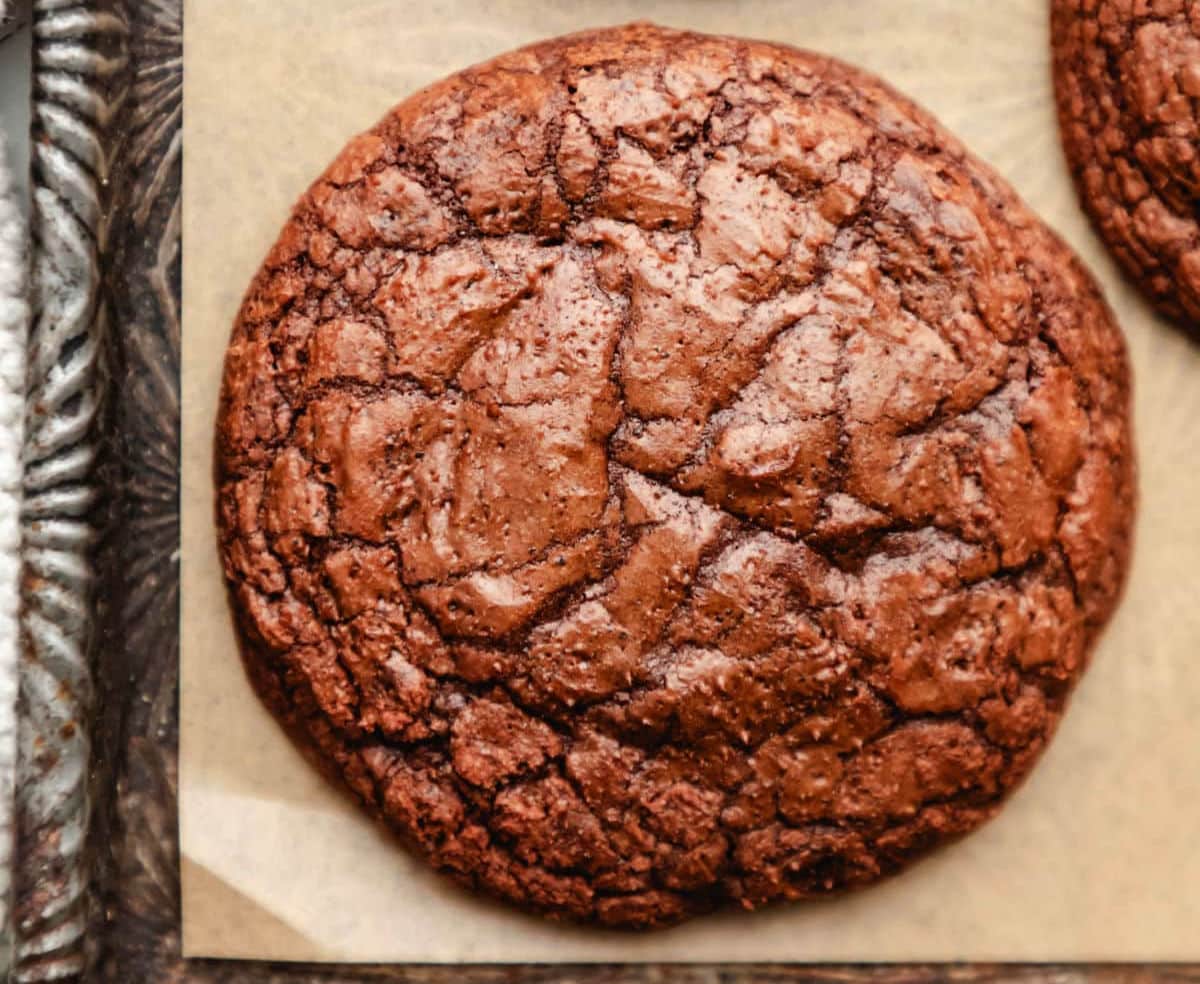
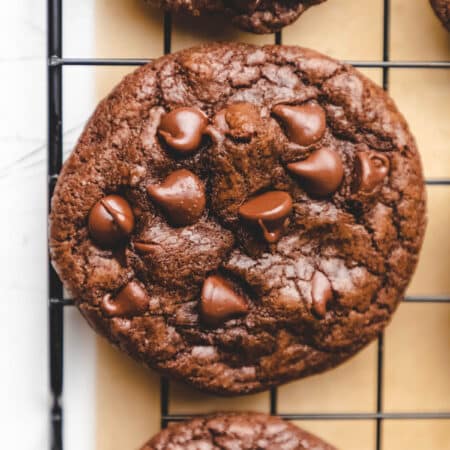
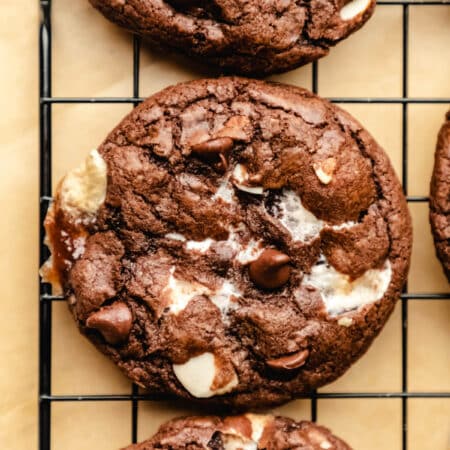
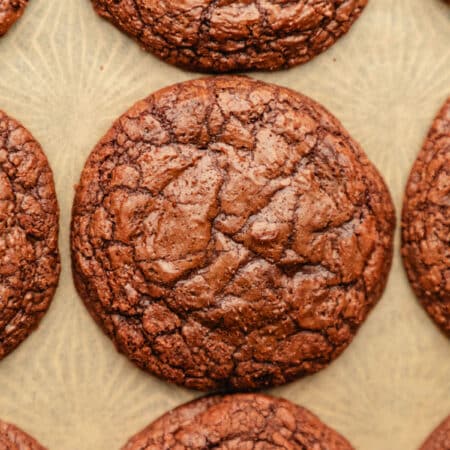
Fudgy brownie cookies with crackly tops and chewy edges — these rich chocolate cookies deliver all the best parts of a brownie in a soft, decadent cookie. This easy homemade recipe creates intensely chocolatey cookies everyone will love.
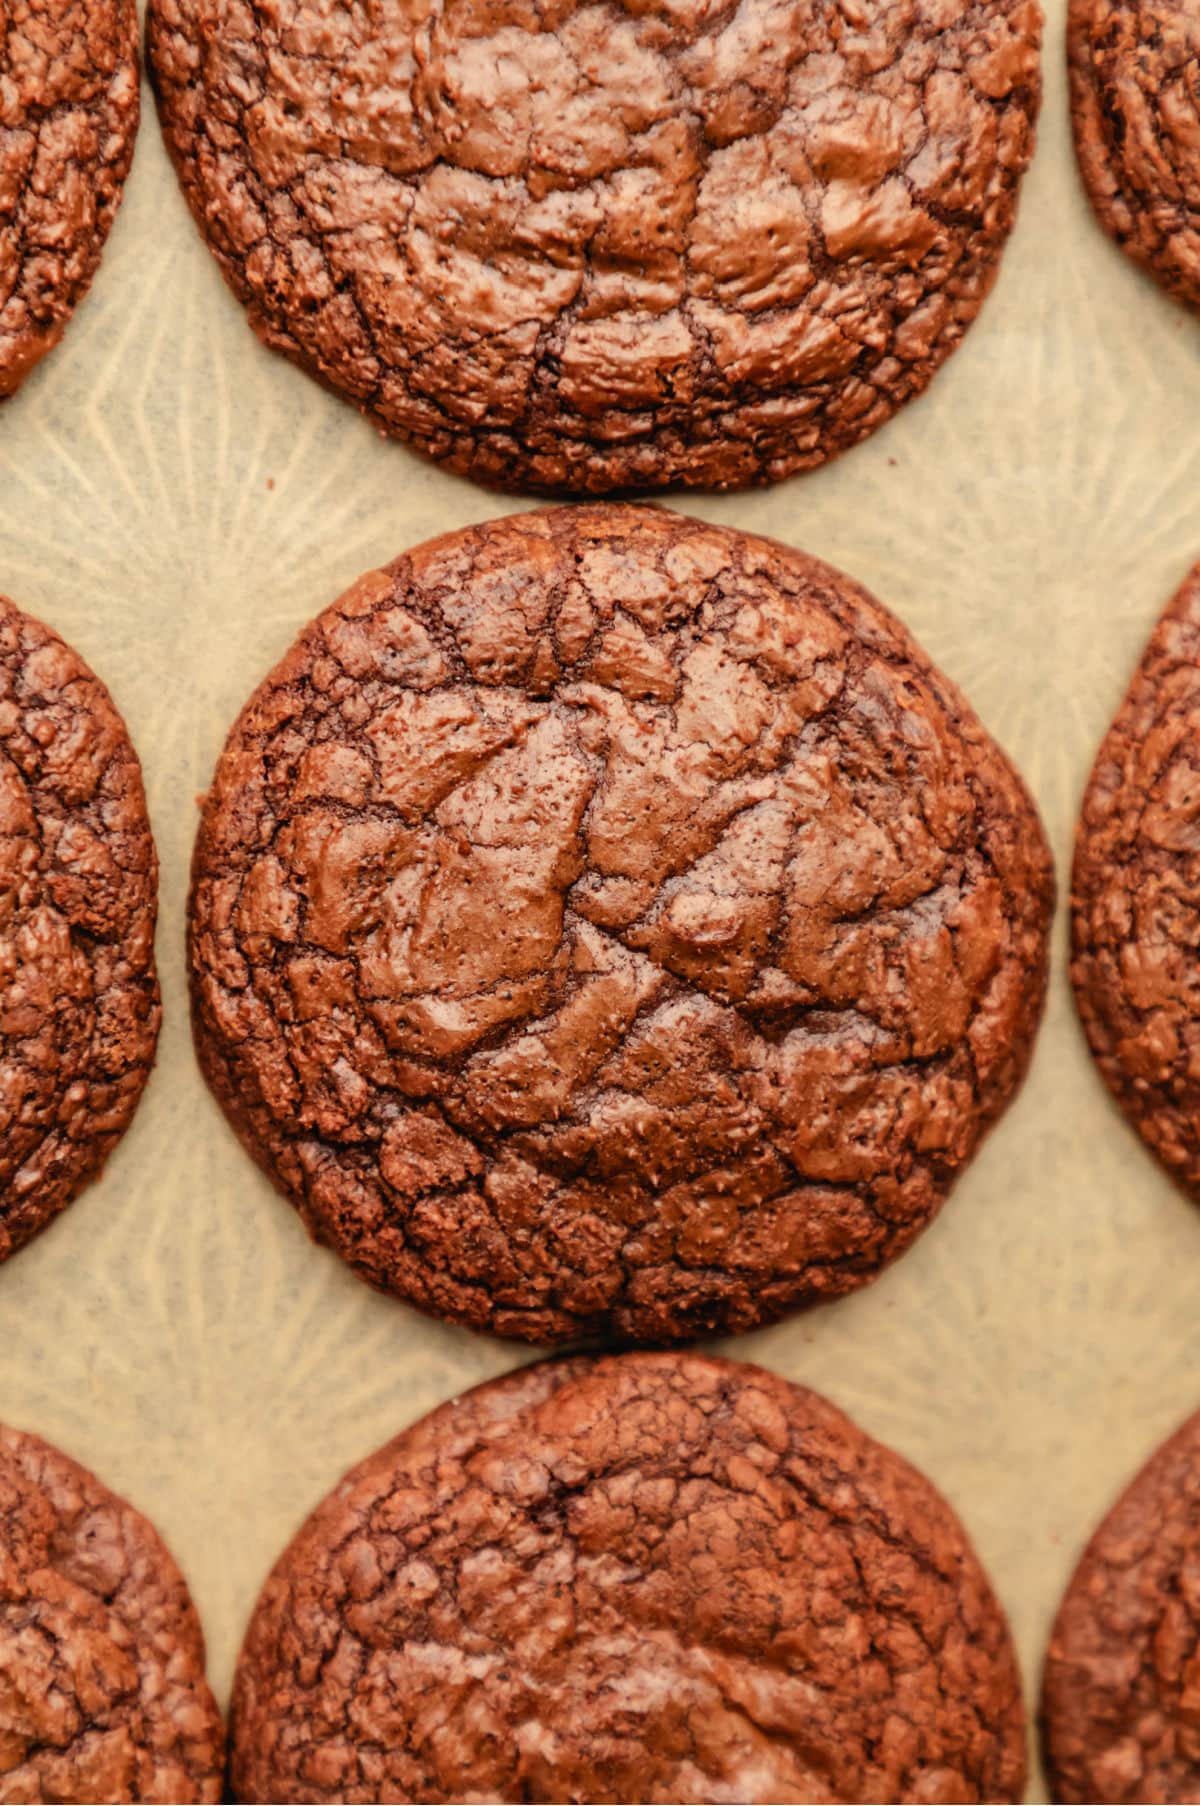
These fudgy brownie cookies have shiny, crackly tops, chewy edges, and rich chocolate centers — just like the best homemade brownies, but in cookie form. After testing different chill times and baking methods, this version delivers thick, soft cookies with deep chocolate flavor every time.
They’re similar to my popular flourless fudge cookies, but these cookies bake up thicker and richer with an even more intense chocolate taste.
“I found this recipe on Pinterest about 5-6 years ago, and I have made them so many times. They’re the perfect chocolate chewy delicious cookie. I always add a little bit of sea salt on top, and they’re so good!! Thank you so much for the recipe!” – Melanie
Ingredient notes and substitutions
- Butter: I use salted butter. If using unsalted butter, increase the salt by about 1/4 teaspoon.
- Cocoa Powder: I didn’t have good results when using Dutch process cocoa powder. I recommend using unsweetened cocoa powder in this recipe.
- Chocolate chips: I’ve tried making the cookies without the mini chocolate chips, and they didn’t have as much of a crackly crust. Don’t skip the mini chocolate chips if you want shinier cookies.
How to make brownie cookies
When you read the recipe, you may be tempted to cut short the mixing time. Please don’t do it! One of the keys to success is to follow the instructions as-written.
The cookies need the extended mixing time. It’s going to make all the difference in your cookies turning out right. So please take the few extra minutes to make it as written.
Step 1: Line your baking sheets with either parchment paper or a silicone baking mat. Set aside.
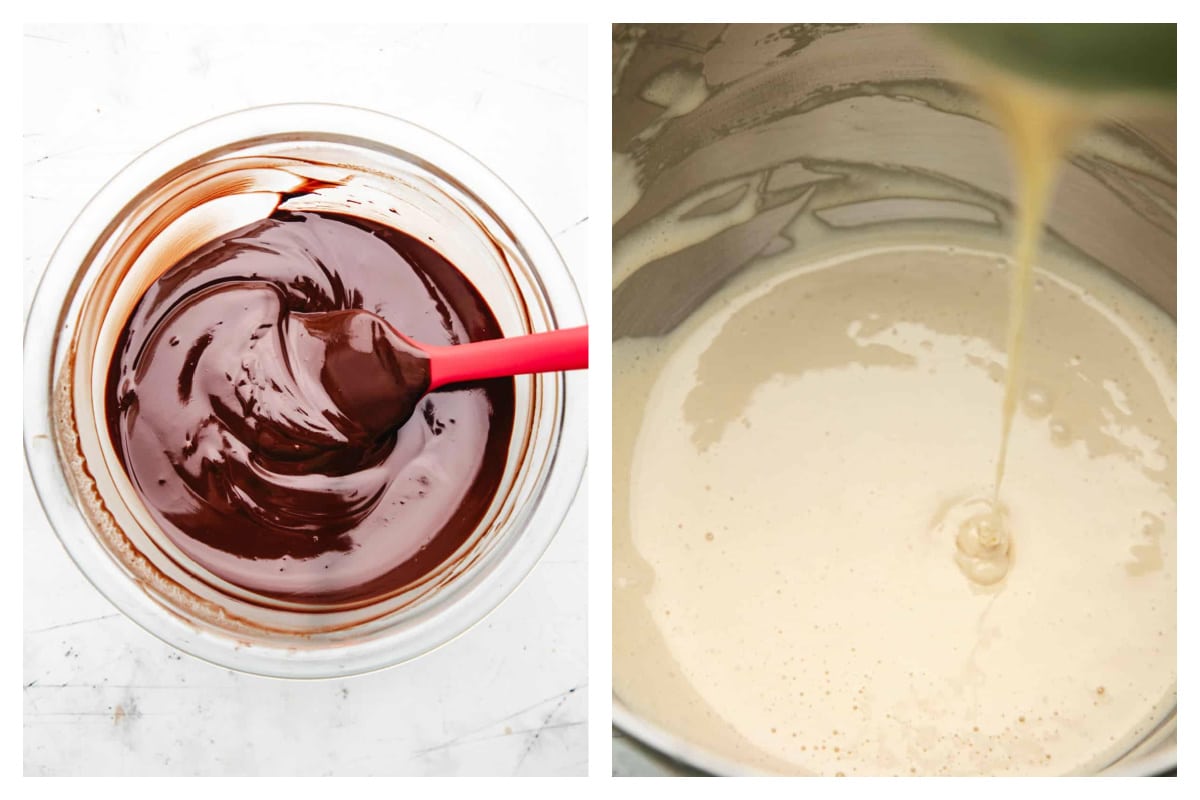
Step 2: Melt the bittersweet chocolate chips and butter in a heavy saucepan over low, stirring constantly, until melted and combined. Remove from heat and set aside.
Step 3: In the bowl of a stand mixer fitted with a paddle attachment, beat the eggs, brown sugar, granulated sugar (white sugar) vanilla, baking powder, and salt on high for 5 minutes, or until the batter is thick and creamy. The batter should fall in ribbons at this point. Tip >> Don’t cut this step short! The cookies will be too thin and won’t have the shiny exterior if you cut the mixing short.
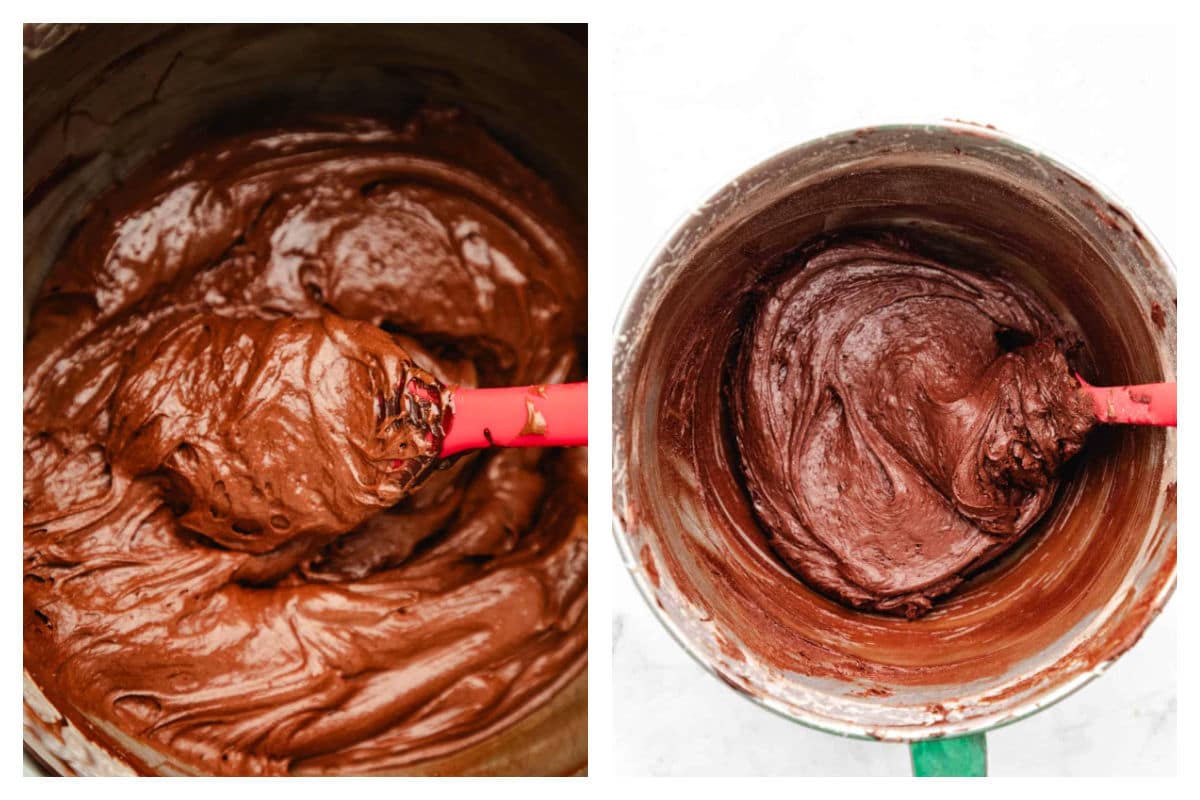
Step 4: Reduce the mixer speed to low and stream in the melted chocolate mixture.
Step 5: Stir in the flour and cocoa powder just until combined.
Step 6: Fold in the mini chocolate chips and nuts, if using. The dough should be thick like brownie batter at this point.
Step 7: Cover and chill the dough for 30 minutes.
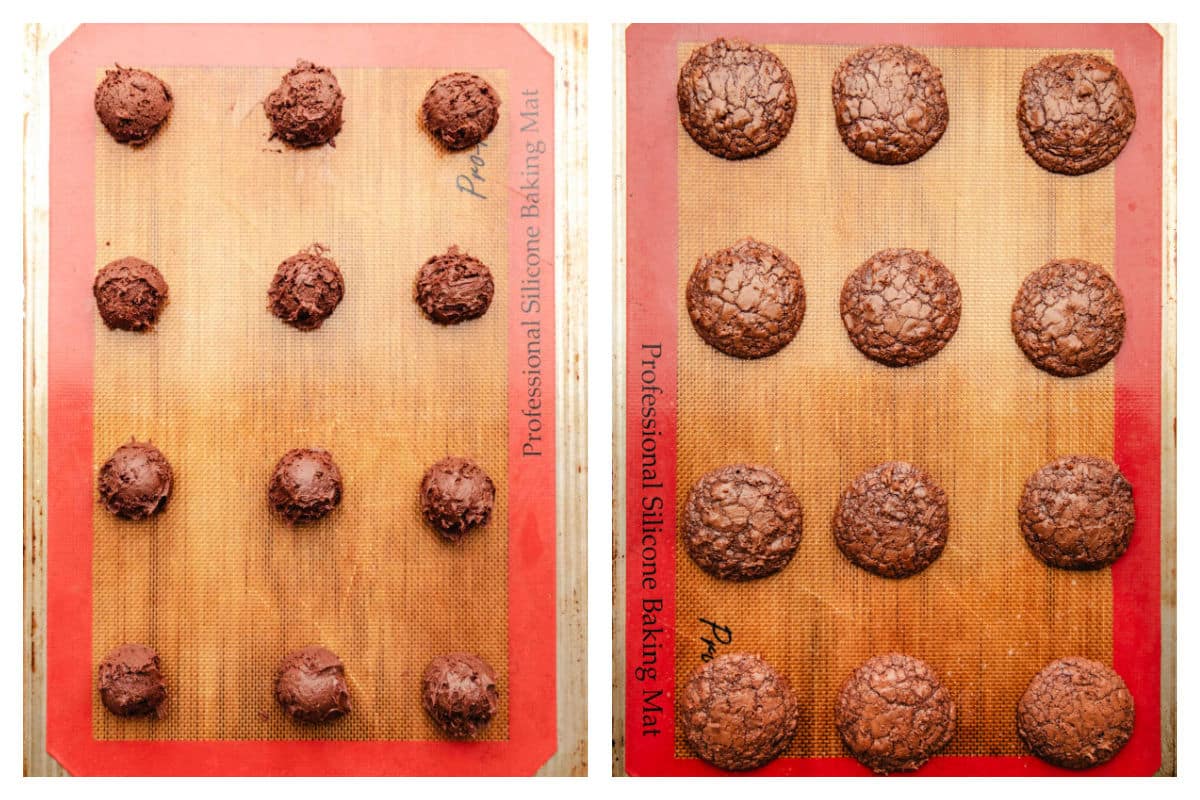
Step 8: Scoop out 1.5 tablespoon scoops of dough (medium cookie scoop). Place the scoops of dough about 2 inches apart on the prepared baking sheets.
Step 9: Bake for about 8-10 minutes. The middles should look soft and a little underdone but the edges should be set. Tip >> Since oven temps can vary, you may find that you need to increase the baking time.
Step 10: Once the cookies have cooled, remove from the cookie sheet to a wire rack or plate.
Recipe Tips!
- Melting: You can also melt the chocolate chips and butter in a microwave-safe bowl. Microwave for 30 seconds, and then stir. Continue microwaving in 15 second intervals and then stirring until melted and well-combined.
- Mixing: I recommend using a paddle attachment to mix the cookie dough. I’ve tried using a whisk attachment, and the cookies didn’t turn out as well.
- Chilling: The cookies will be flat and will bake out if you skip chilling the dough. Also, if your refrigerator is packed doesn’t chill very well, you may find that you need to add a little extra time to the given chilling time.
- Baking: The cookies will look underbaked in the center but be set at the edges, and the crackly, shiny crust will develop as the cookies cool.
- Chocolate flavor: You can add 1 teaspoon of espresso powder for more intense chocolate flavor.
Troubleshooting flat cookies
There are two things that could cause flat cookies.
First, cutting the mixing time short or using a hand mixer/electric mixer (or mixing by hand). The volume of air that a stand mixer can beat in gives the cookies lift.
If using a hand mixer, you’ll need to add additional mixing time. I’ve heard from several people who added about 5 minutes of additional time when using a hand mixer. They’ve said that that helped to incorporate enough air.
Second, the other thing that can cause flat cookies is not adequately chilling the dough. For me, 30 minutes of chill time works well.
However, you may find that you need to add additional chilling time. Factors like the temperature that your fridge is set to, how well it chills, and even how full your fridge is can affect how long the dough will need to chill.
Recipe FAQs
This recipe has over 1,000 comments and questions. I’ve taken a few of the most common questions and have answered them here.
I’ve used bittersweet chocolate chips and semisweet chocolate chips to make the cookies. Both have worked well.
I’ve frozen the dough in scoops and have baked the dough from frozen. While I do add more time when baking from frozen, otherwise, I’ve had good luck with baking the frozen dough.
I’ve made the cookies in 1.5 tablespoon, 2 tablespoon, and 4 tablespoon (1/4 cup) scoops. All three of those sized cookies are pictured here. 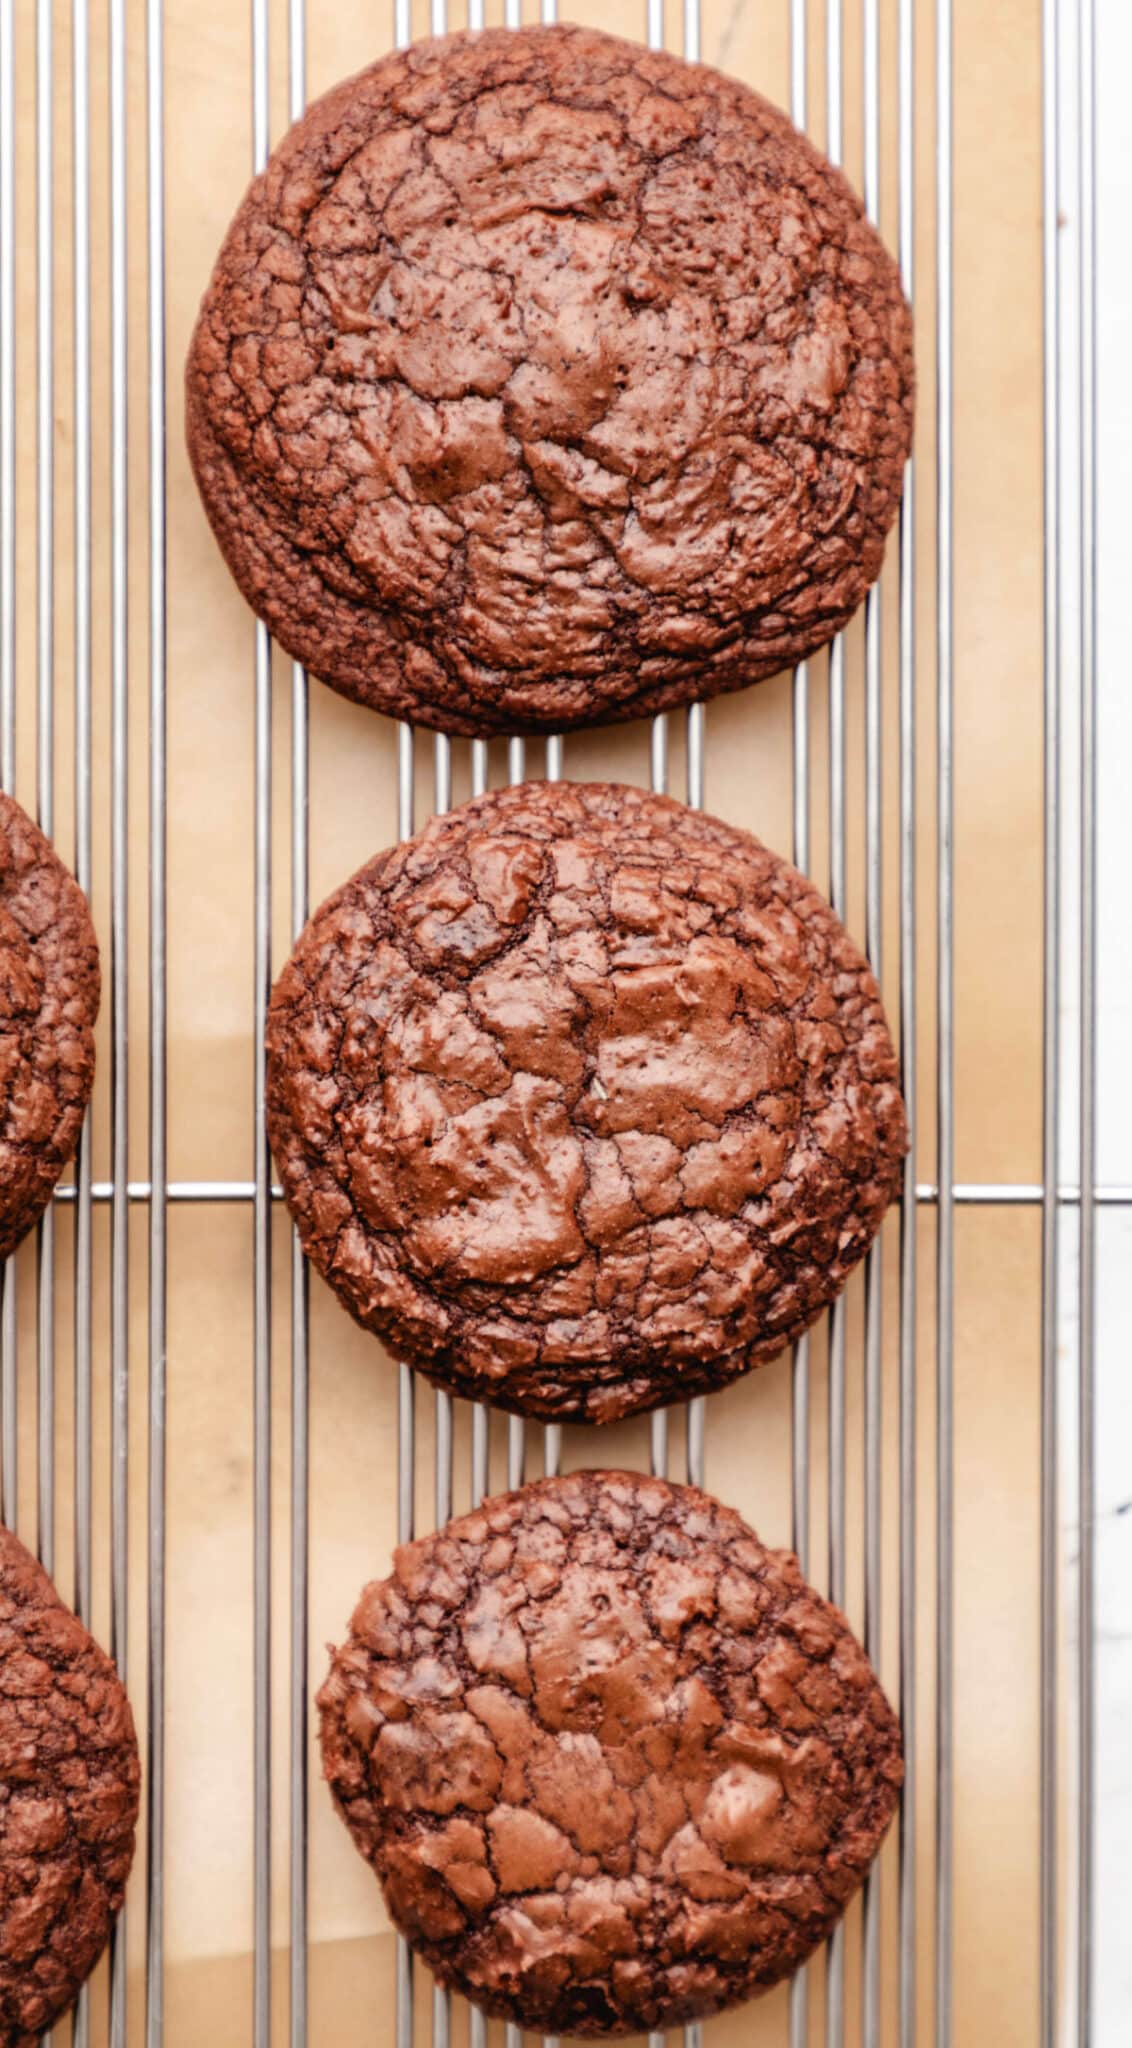
Storage
Store any leftover brownie cookies in an airtight container at room temperature. The cookies will keep for up to 3 days when properly stored.
More popular cookie recipes!
If you’ve tried this brownie cookie cookie recipe, don’t forget to rate the recipe and leave me a comment below. I love to hear from people who’ve made my recipes!
You can subscribe to receive my latest recipe newsletters or follow me on Facebook, Instagram, Pinterest, YouTube, or TikTok for even more delicious food.

Brownie Cookie Recipe
Ingredients
- 12 ounces bittersweet chocolate chips 60-70% cacao
- ½ cup butter
- 3 large eggs
- 1 cup granulated sugar
- ¼ cup light brown sugar
- 1 tablespoon vanilla extract
- ½ teaspoon baking powder
- ½ teaspoon salt
- ¾ cup all-purpose flour
- ¼ cup unsweetened cocoa powder¹
- 1 cup pecans chopped, optional
- ½ cup mini semisweet chocolate chips
Instructions
- Melt bittersweet chocolate chips and butter in a heavy saucepan over low heat, stirring constantly until melted and well-combined.12 ounces bittersweet chocolate chips, ½ cup butter
- Remove from heat, and set aside.
- In the bowl of a stand mixer fitted with a paddle attachment, beat the eggs, sugars, vanilla, baking powder, and salt on high speed 5 minutes, or until the batter is thick and creamy. This step is key, so make sure to beat the mixture for the full 5 minutes.3 large eggs, 1 cup granulated sugar, ¼ cup light brown sugar, 1 tablespoon vanilla extract, ½ teaspoon baking powder, ½ teaspoon salt
- Reduce the speed to low, and mix in the melted chocolate until well-combined.
- Stir in flour and cocoa powder just until combined.¾ cup all-purpose flour, ¼ cup unsweetened cocoa powder¹
- Add nuts, if using, and mini chocolate chips. Stir in to combine. The batter should be the consistency of a thick brownie batter at this point.1 cup pecans, ½ cup mini semisweet chocolate chips
- Cover the batter, and chill for 30 minutes.
- Preheat oven to 350 F. Line two baking sheets with parchment paper.
- Using a 1.5 tablespoon cookie scoop, drop batter onto the prepared cookie sheets about 2 inches apart.
- Bake cookies 8-10 minutes. The cookie will look set at the edges but still be a little wet looking in the center. Don’t overbake, or the cookies won’t be crackly and fudgy.
- The shiny, crackly crust will develop as the cookies cool on the baking sheet.
Video
Notes
- Butter: I use salted butter. If using unsalted butter, increase the salt by about 1/4 teaspoon.
- Cocoa Powder: I didn’t have good results when using Dutch process cocoa powder. I recommend using unsweetened cocoa powder in this recipe.
- Chocolate chips: I’ve tried making the cookies without the mini chocolate chips, and they didn’t have as much of a crackly crust. Don’t skip the mini chocolate chips if you want shinier cookies.
- Nutrition facts are estimated.
Nutrition
Did You Make This Recipe?
Share it with me on Instagram @i_heart_eating and follow on Youtube @katedean and Pinterest @katedean for more!
Adapted from Everyday Dishes.
Reader Interactions
Love this recipe?
Share your thoughts below and let’s chat! Make sure to connect with me on your favorite social platform below and show me what you made!


Comments & Reviews
Christine says
Which attachment, paddle or whisk, is used to beat the egg and sugar mixture?
Kate says
Hi! I just use the paddle attachment. Hope that helps!
Nancy says
Just made these incredible lil morsels of heaven! They’re perfect! Brownie in cookie form, best of both worlds. 8 minutes is just enough time to ensure gray chewy delightfulness. I’m goin freeze half the batch to see how they hold up. Fingers crossed, they’ll be just as delectable once frozen.
Kate says
Thank you! I’m so glad that you liked the cookies! =) I would love to hear how they work out if you wouldn’t mind. Thank you again! =)
Kelly says
These cookies are amazing!! I left out the nuts because I’m personally not a fan of nuts in my brownies. I also left the batter in the fridge for almost 5 hours, took it out, had to microwave to thaw a bit and they still turned out great!
Kate says
Thank you so much!! I’m glad to hear that they came out well for you. =) Thank you for coming back to comment!
Muskan says
Hey,can I make brownie of this batter?
Kate says
Hi! I haven’t tried to bake this batter as a pan of brownies. I’ve made it in a muffin tin, and it worked well, but I haven’t tried it to say for sure.
Kylie says
Delicious, I make these for the holidays and the entire family loves them.
Kate says
Yay! I’m glad that everyone liked them! =) Thank you for coming back to comment.
Sarah Meikle says
Love them. I will make them multiple times this holiday season! Way better than I imagined. I followed the recipe to a T except I also left them in for 15 min in my electric oven. My new go to easy yummy dessert!
Kate says
Thank you! I’m so glad that you liked the cookies! Thank you for taking the time to come back to comment! =)
Terry Swierzowski says
Can you freeze these cookies after you bake them? I’m afraid they would lose their “crackle”.
Kate says
I haven’t tried to freeze the cookies after baking them, so I’m afraid that I’m not sure on this one. Sorry!
Reanna Pitts says
What should the consistency of the batter be ?
Kate says
Before of after you chill it? In step 6, it says that the batter should be the consistency of a thick brownie batter at that point. After you chill it, it should firm up a bit and be quite thick.
Kathleen says
Do you think the dough could be made into balls and frozen if I defrost before baking?
Kate says
I’m not sure. I haven’t tried to freeze this dough. If you try it, I’d love to hear how it comes out!
Jessica says
Hello! These look amazing!… might be a dumb question but can they be baked in a pan like actual brownies? Or is this strictly for cookies?
Kate says
Hi! Thank you! I’ve baked these cookies in a muffin tin, and they work well like that. However, I’ve never tried to bake them as brownies, so I’m not sure how they would come out that way.
Michelle Perkins says
OMG AMAZING!! I followed recipe to the T except baked for 15 mins…let cool on cookie sheet for 10 mins…absolutely perfect and soooooo good
Kate says
Thank you! I’m so glad that you liked the cookies! Thanks for your notes about baking time. I’ve noticed that there can be quite the range! Thanks again! =)
Jon says
These are really good, but 8 to 10 minutes is not long enough for baking time, especially if you are using a gas oven. More like 15 minutes.
Kate says
Thanks for the note about gas ovens! I have an electric oven, so that’s what my timing is based on.
Catherine says
Great recipe, huge hit at the dental office!
I used a small cookie scoop so the cookies are less likely to broke when stacked in the cookie jar.
Kate says
Thank you! I’m so glad that they were a hit! =) Thank you for the tip, too!
Robin Heddinger says
have you made these with Splenda?
Kate says
No, I’m sorry. I haven’t tried using Splenda in this recipe.
Liz says
Tried this recipe for something different than my usual chocolate chip. Crunchy on the outside and chewy inside, was perfect! Brought them into work and everyone loved them! New favorite cookie!
Kate says
Thank you so much! I’m so glad that you and your co-workers liked the cookies. =) Thanks for coming back to comment!
Lisia says
I just finished these cookies! OMG they are so Delicious!!! I let them cool for 10 minutes and couldn’t resist trying one! They turned out perfect! I used the Dutch processed cocoa because that’s what I have in my pantry.
Kate says
Thank you! And thank you for your note about using Dutch processed cocoa! It’s always helpful to hear what else will work. =)
Angie D says
Hello! I was thinking about baking these cookies to be wedding favors. Do you know if these cookies will freeze well after they’ve been baked?
Kate says
I’m sorry, but I haven’t tried to freeze them. I wish I had a better answer for you! Good luck!
shania jae says
I recommend this recipe 110%! They are delicious! <3
Kate says
Thank you so much! I’m so glad that you like the cookies. =) Thanks for coming back to comment!
Kelli says
Can I leave the batter in the fridge overnight to bake the next day?
Kate says
I’m not sure how it will work. The batter tends to set up more the longer that it’s in the fridge. If you wanted to leave it overnight, I think you would need to set the batter out before baking to let it soften up.
Jazzyg says
I followed the instructions but my dough is spreading all over my pan and they stick to each other when baked. I tried to put it in a cup cake pan and it worked! But it doesn’t look like a cookie anymore. I tried it again, this time I put the dough in the ref over night and it’s not the same again like in the picture, the crinkly on top didn’t appear but still taste really goood! ? please help
Kate says
Yes! Let’s figure this out. =) The first thing that I think of is that the egg may need to beaten longer. What did your dough look like? Was it thick like a thick brownie batter, or was it thinner like a cake batter?