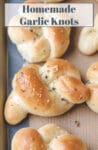
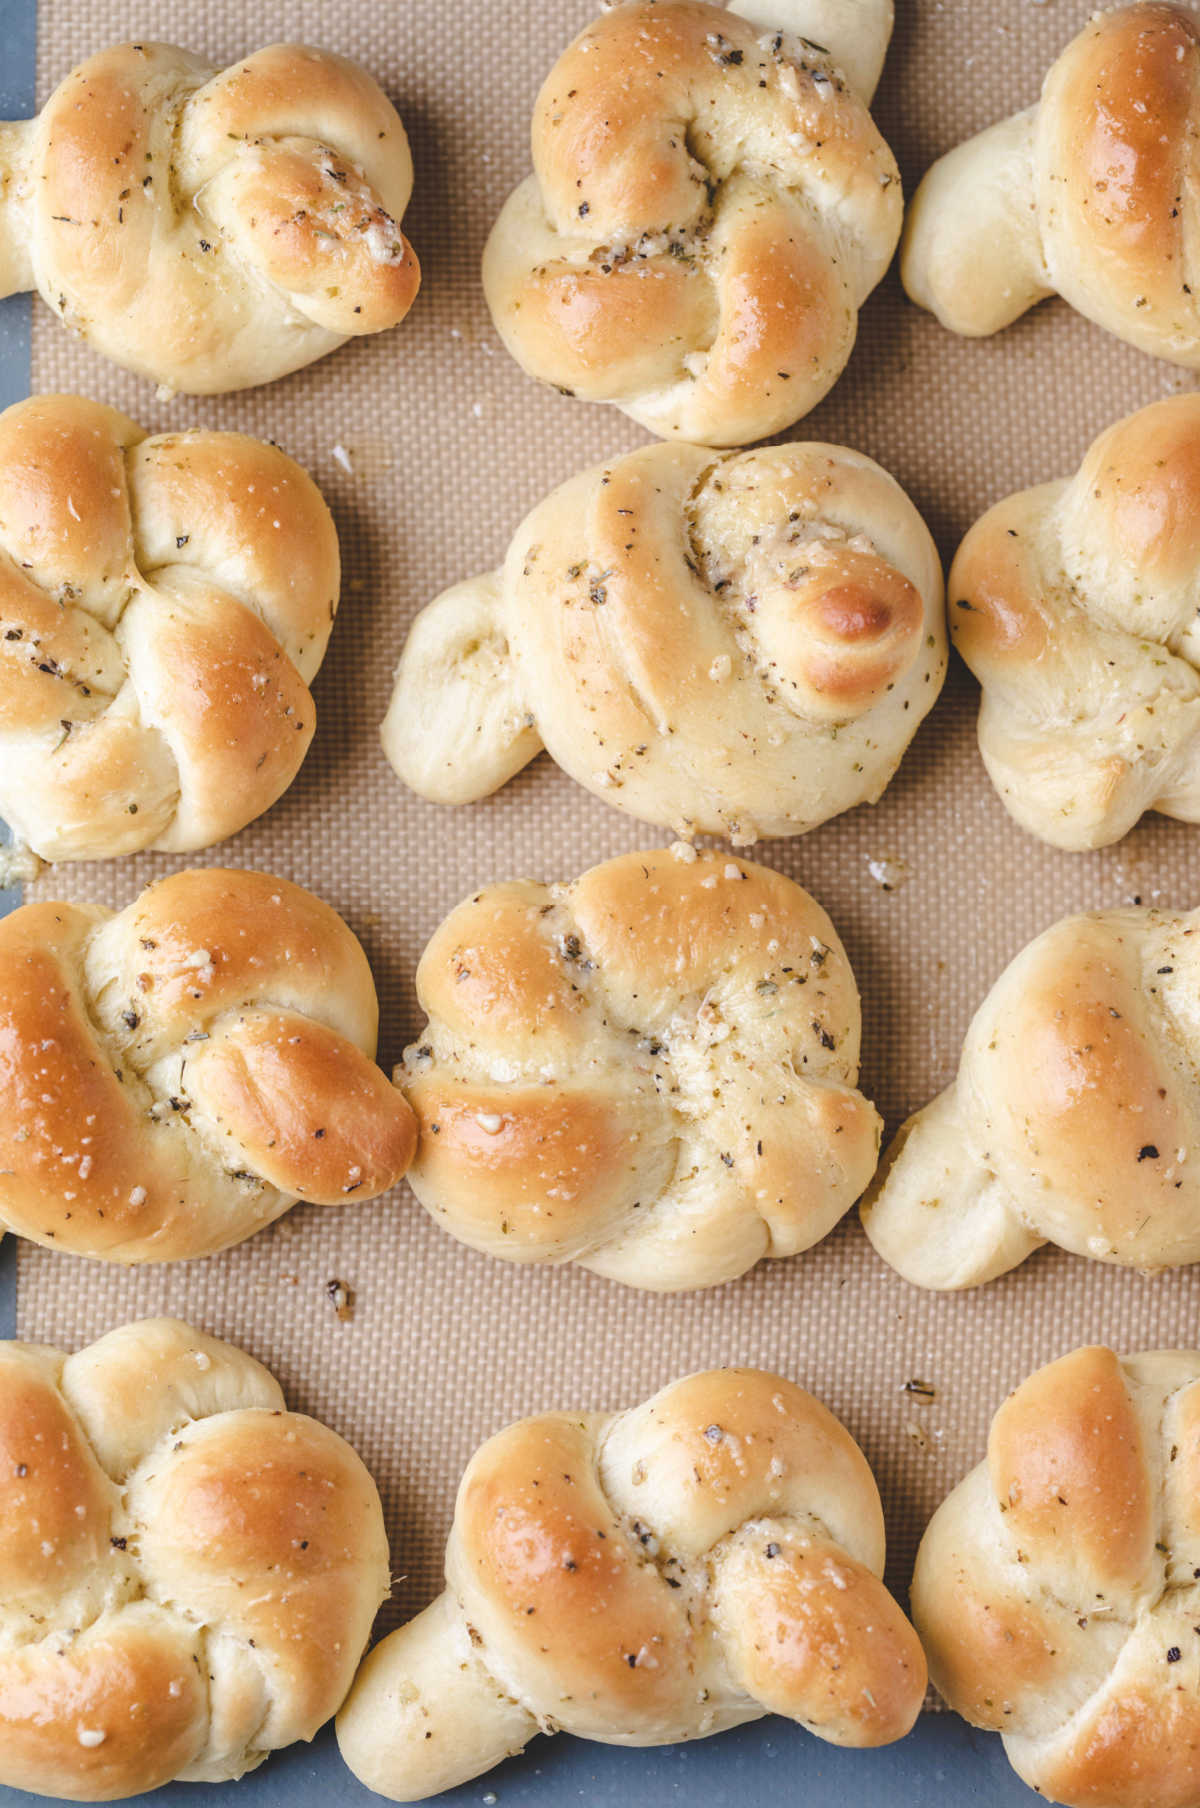
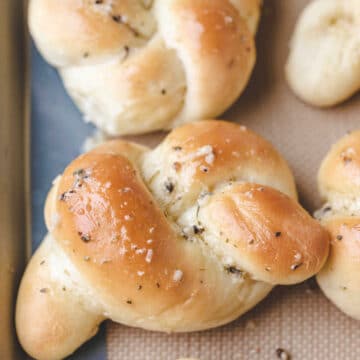
Homemade garlic knots don’t have to be difficult to be delicious! These garlic knots are super easy – they can be made from scratch in just 30 minutes.
These homemade garlic knots are ready – start to finish – in just half an hour. And they taste so good that you’d never guess how easy they are!
This is a great starter recipe if you’ve never made anything with yeast before. It’s pretty hard to hurt this dough (just don’t kill the yeast!).
I think you’ll be pleasantly surprised at just how easy this recipe really is.
“So good! I will add 3tbs butter for topping next time. Freaking delicious, so easy! Great last minute add to any dinner” – Kylie
Ingredient notes and substitutions
- Butter – I use salted butter in both the dough and the garlic butter topping. If using unsalted butter, increase the salt to 3/4 teaspoon in the dough and add a pinch or two to the garlic butter.
- Milk – I like to use 2% milk. Using skim milk will give you a leaner dough and using whole milk will give you a slightly softer, richer dough.
- Instant yeast – You can also use active dry yeast. See the section below in FAQs for more information.
- Garlic powder – Be sure to use garlic powder, not garlic salt.
- Parmesan cheese – The cheese is optional. Feel free to omit it if you prefer.
How to make homemade garlic knots
Here you’ll find step-by-step photos showing how to make this recipe. The full recipe, including ingredients, is given below.
Step 1: In a small saucepan, melt butter. When butter is mostly melted, stir in milk, and heat mixture to 100-110 F.
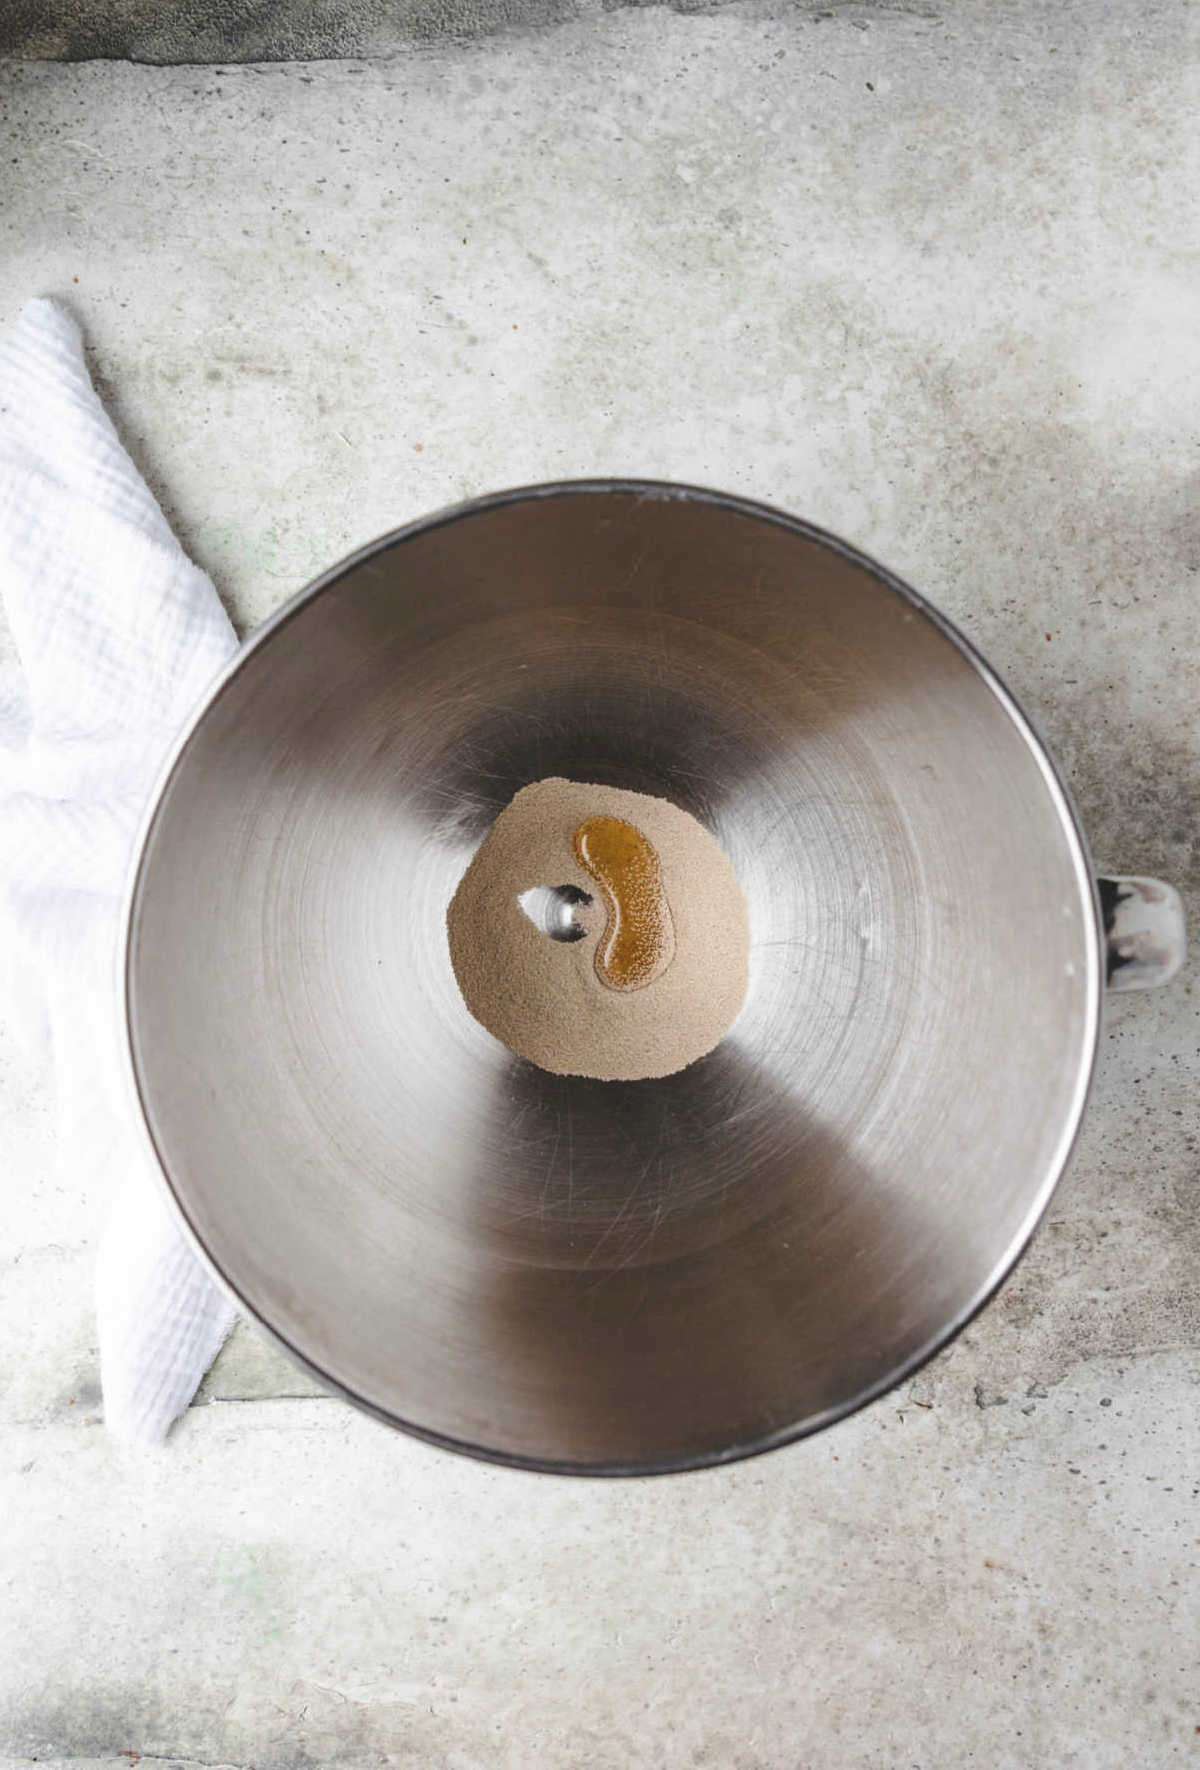
Step 2: Meanwhile, add yeast and honey to the bowl of a stand mixer fitted with a paddle attachment (or a large mixing bowl if mixing by hand.

Step 3: When milk mixture is at temperature, add to yeast and honey; stir to combine.
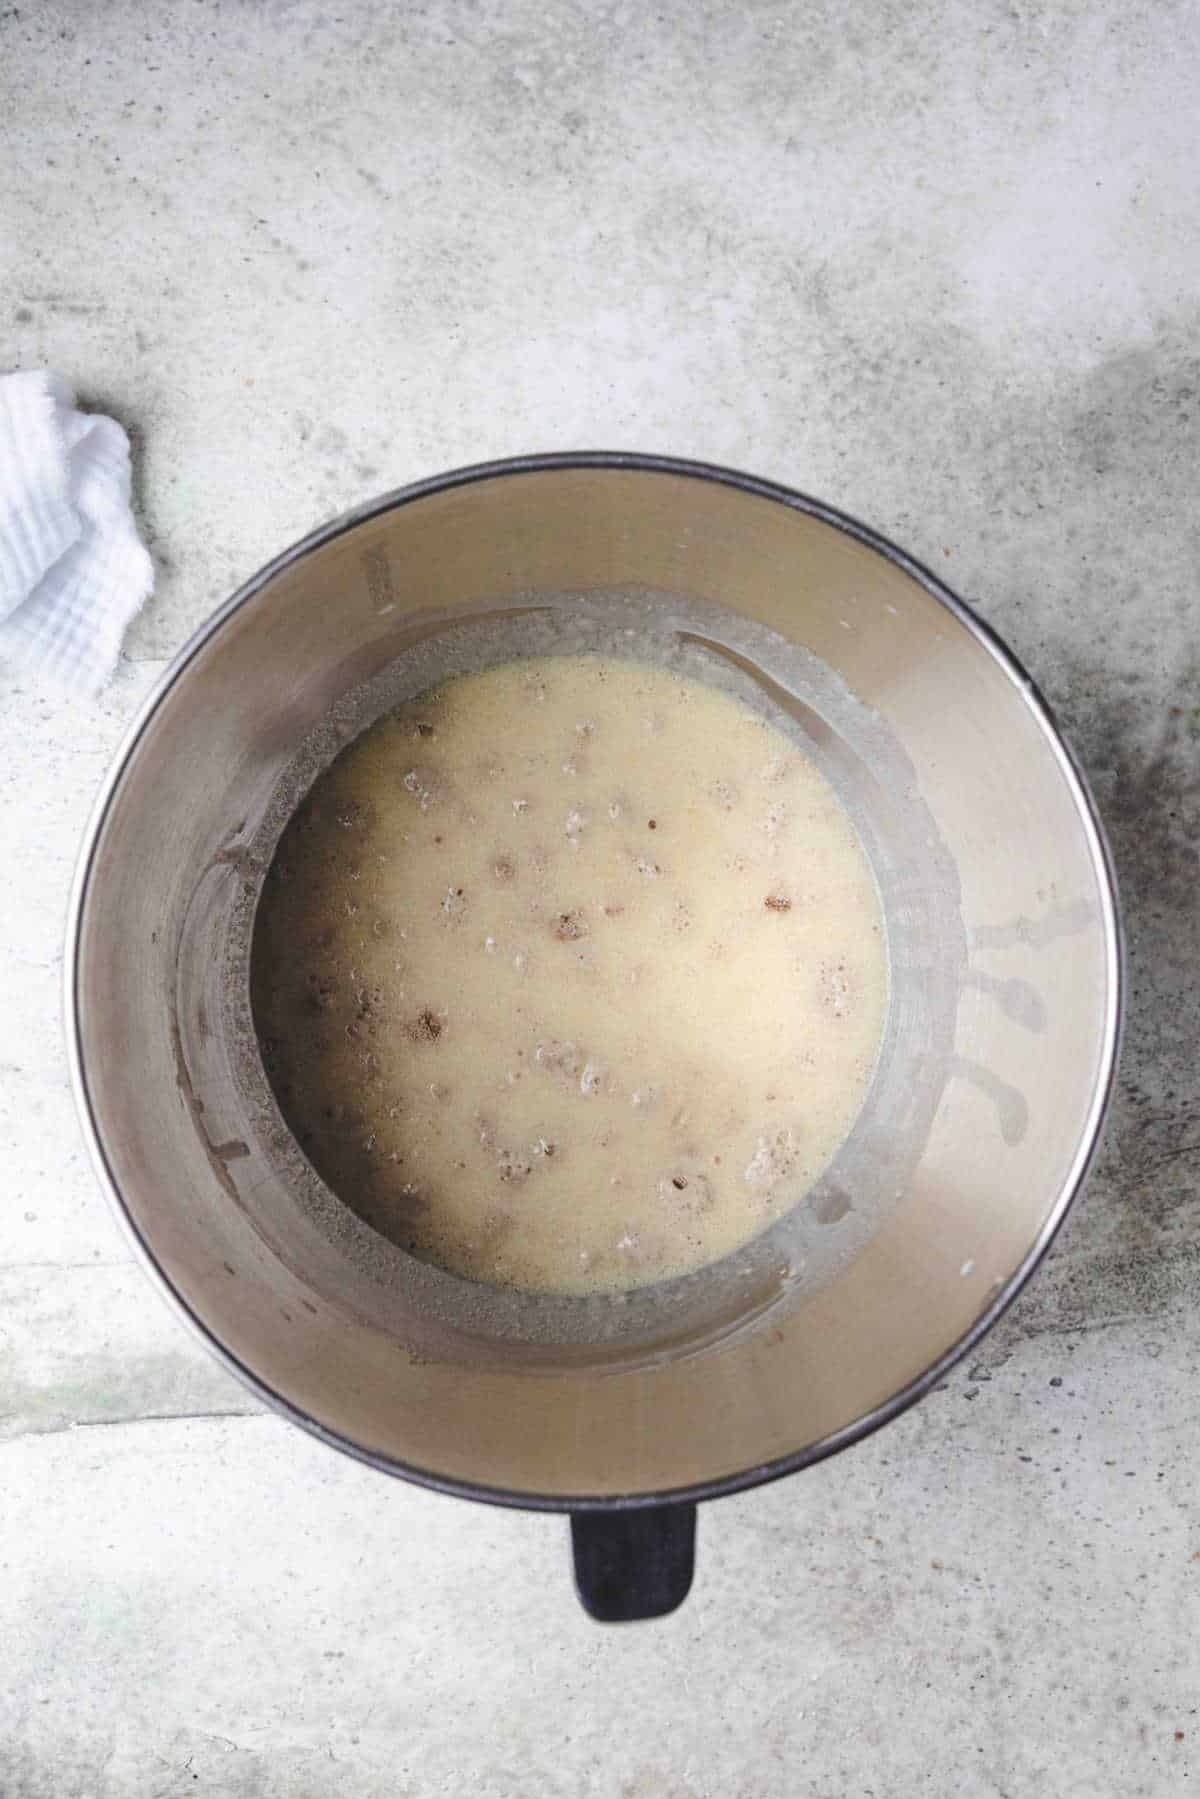
Step 4: Add salt and egg, and stir until combined. Stir in 2 ½ cups of flour.
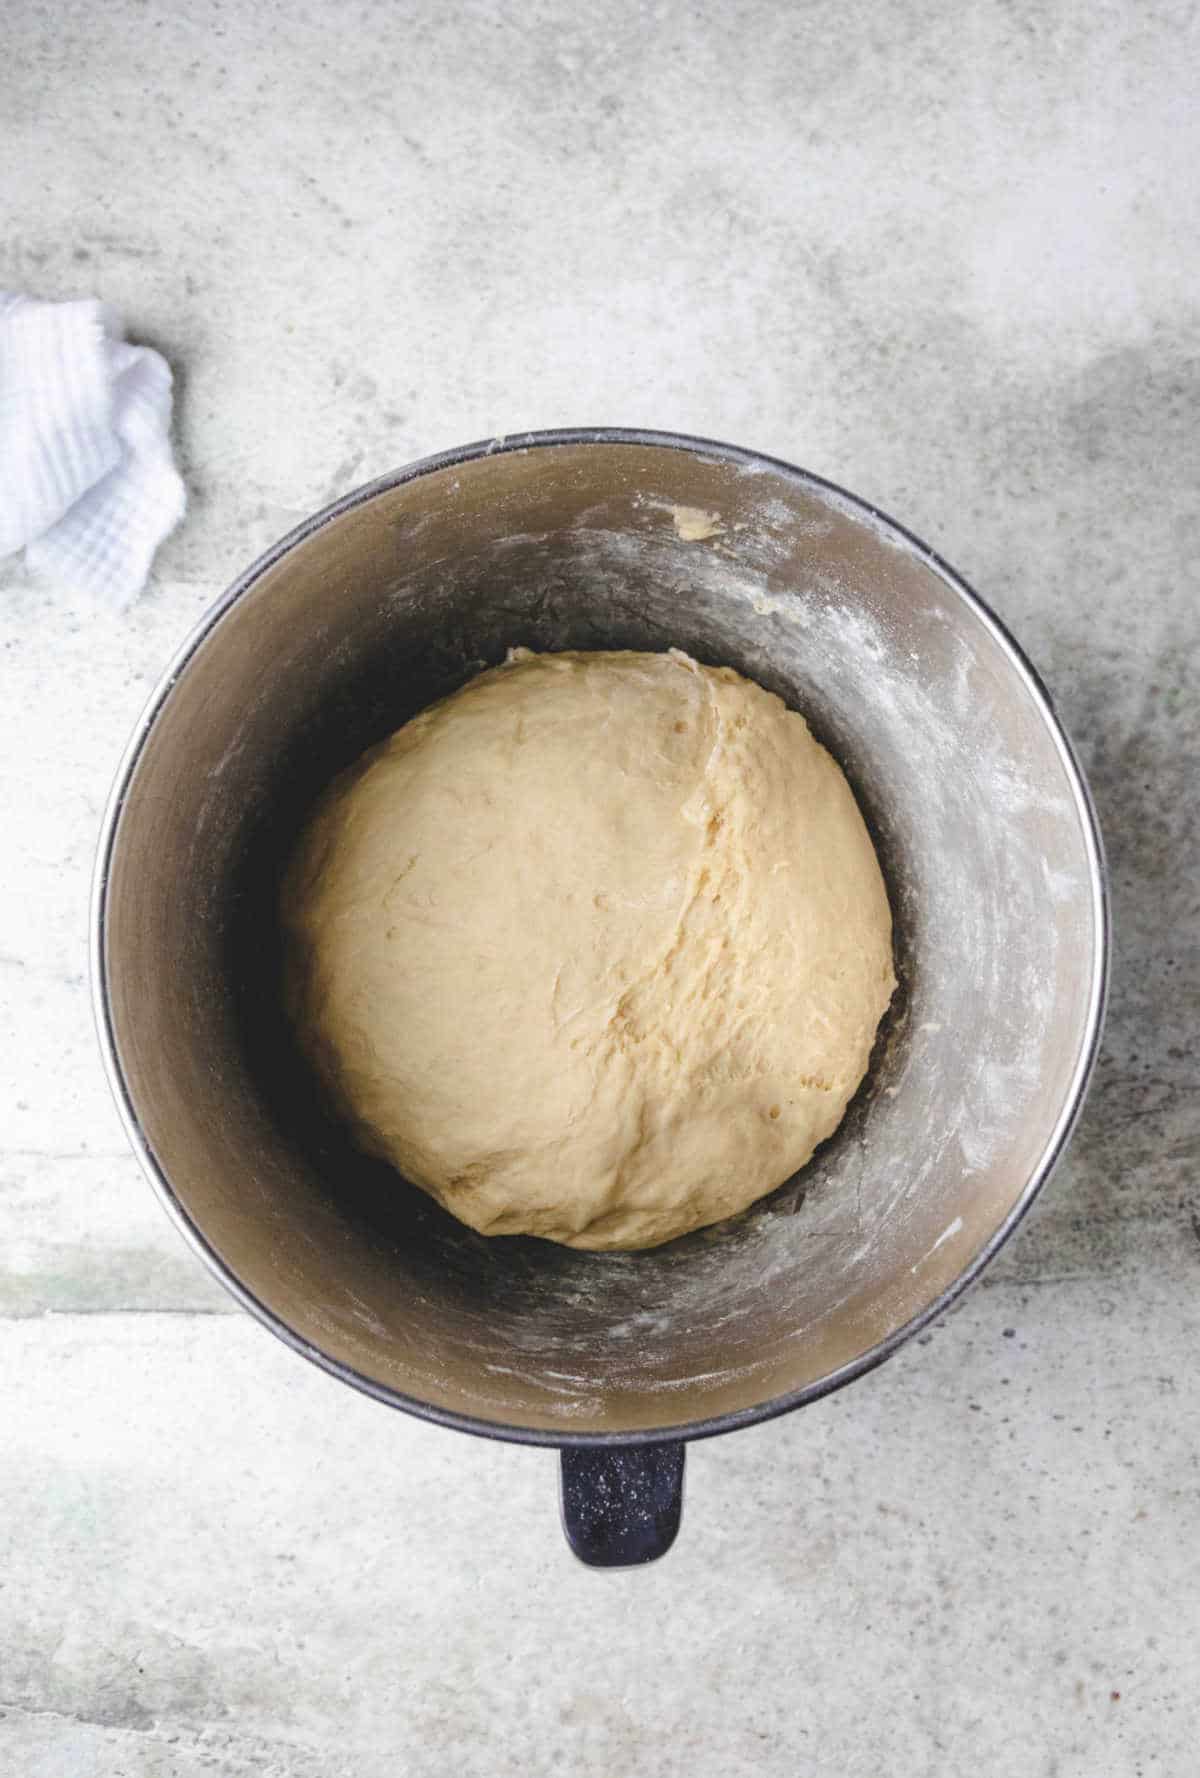
Step 5: Add remaining flour until dough clings to paddle and cleans the sides of the bowl. Switch to the dough hook, and knead for 2 minutes (or by hand for about 5 minutes).
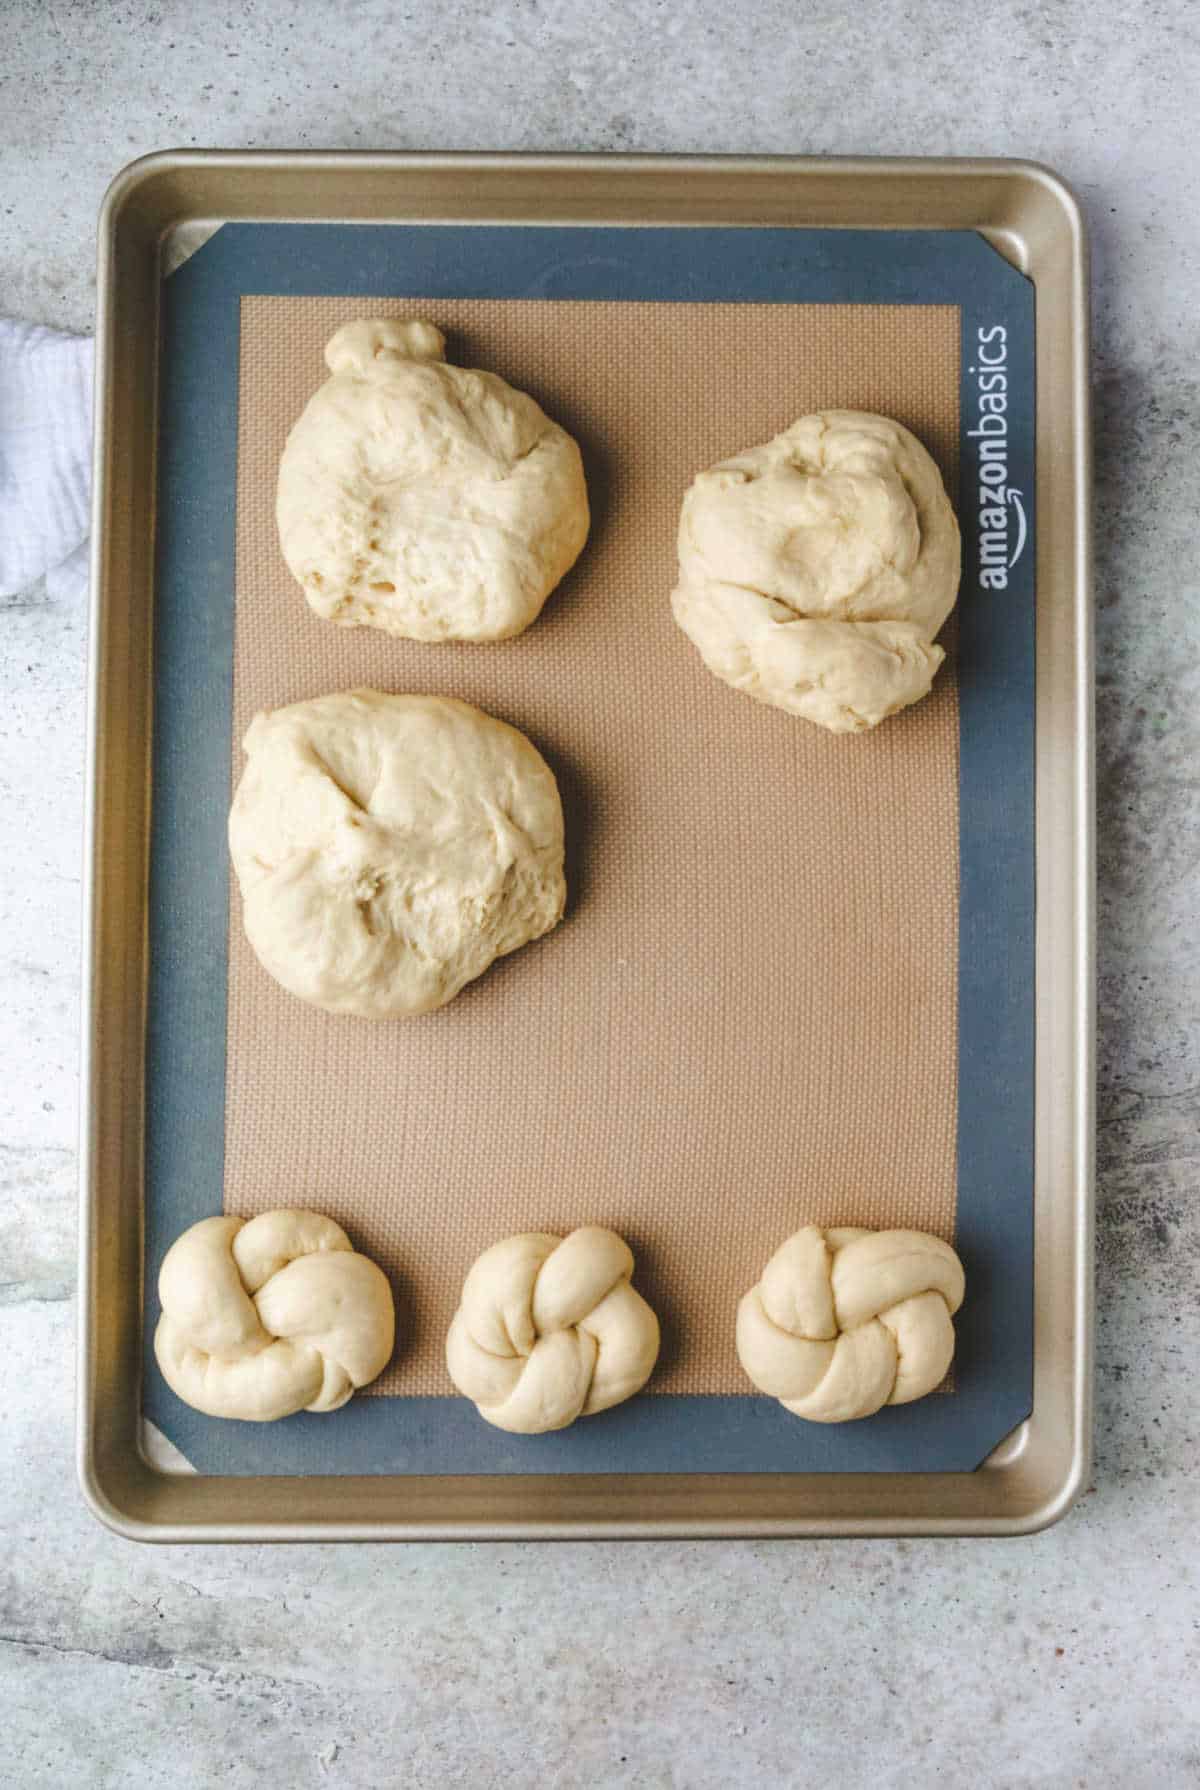
Step 6: With lightly floured hands, shape dough into 12 knots, and place dough on prepared baking sheet. Cover, and let dough rest for 10 minutes.
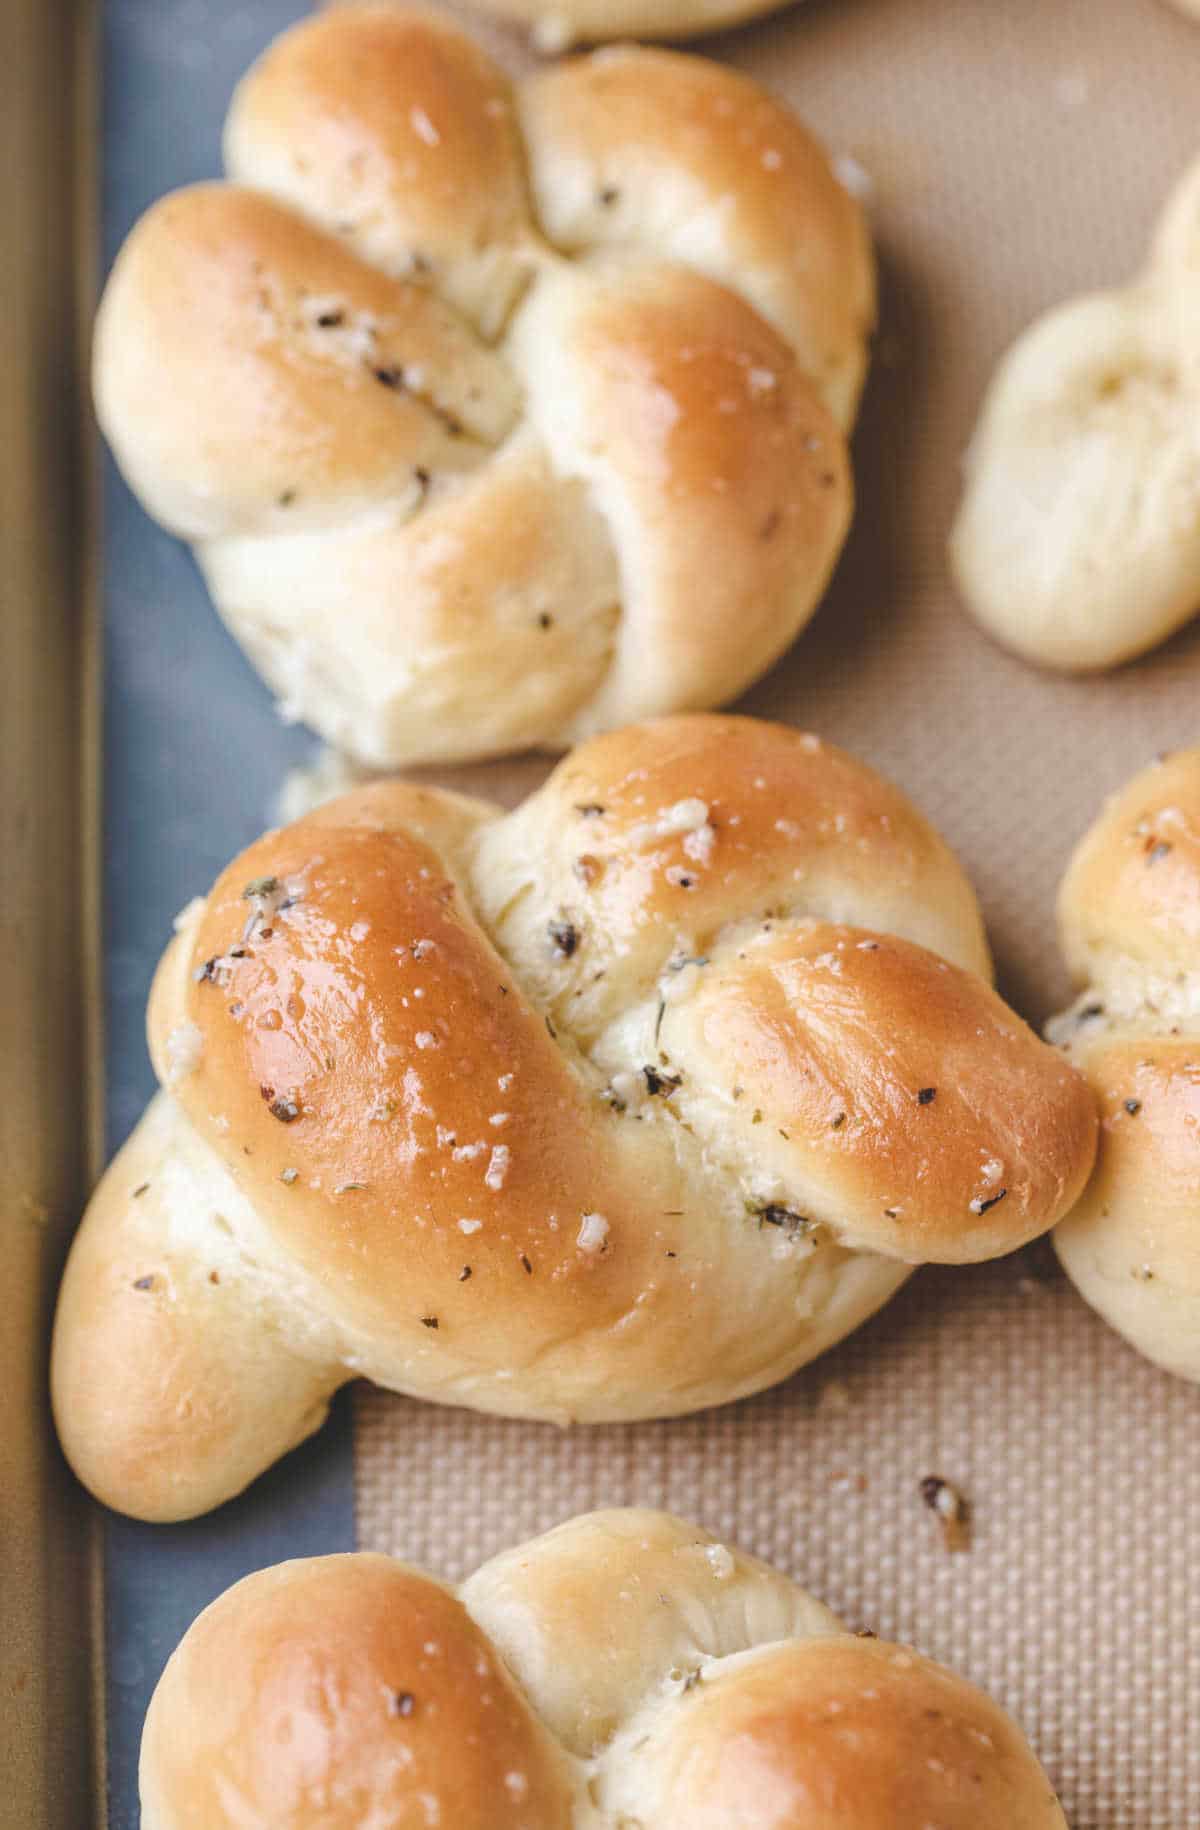
Step 7: Bake for about 9-12 minutes, or until lightly golden brown. While the knots are baking, prepare the garlic butter.
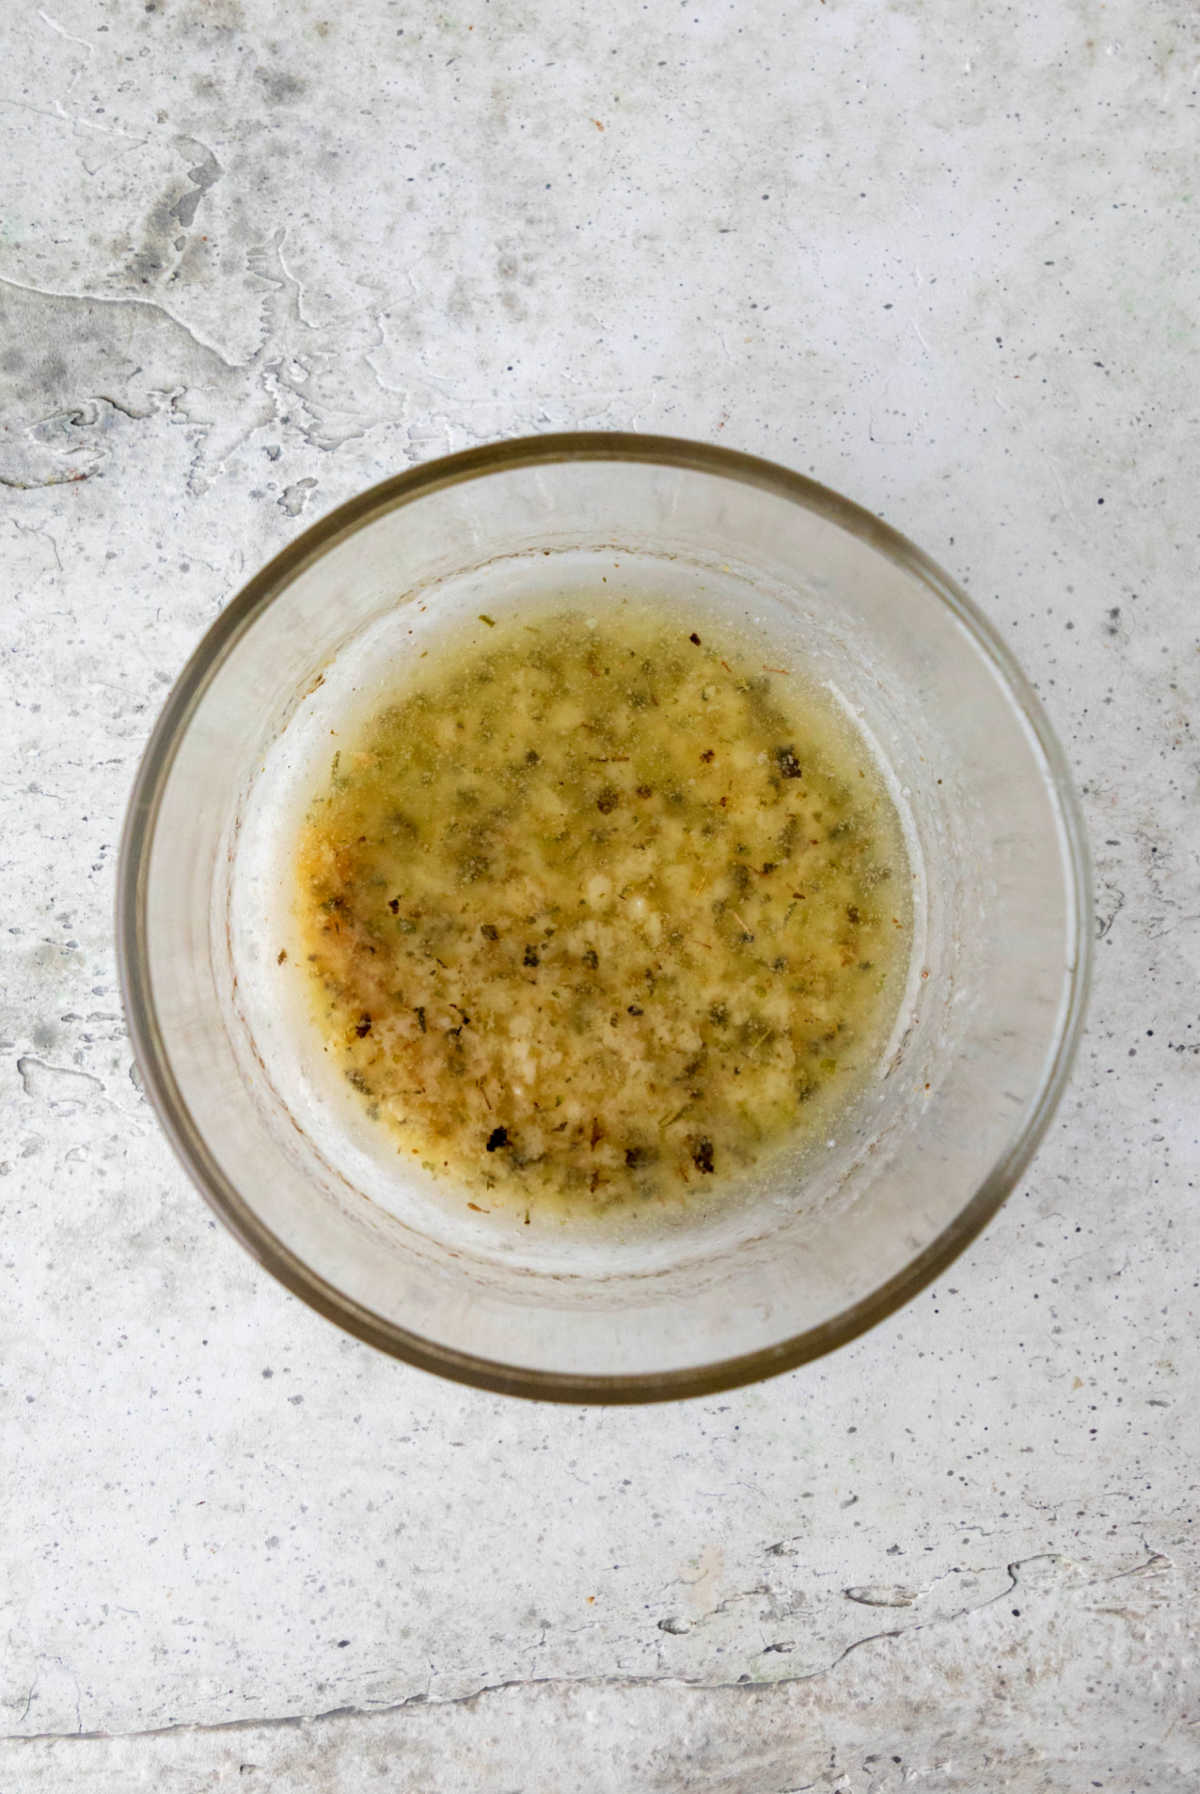
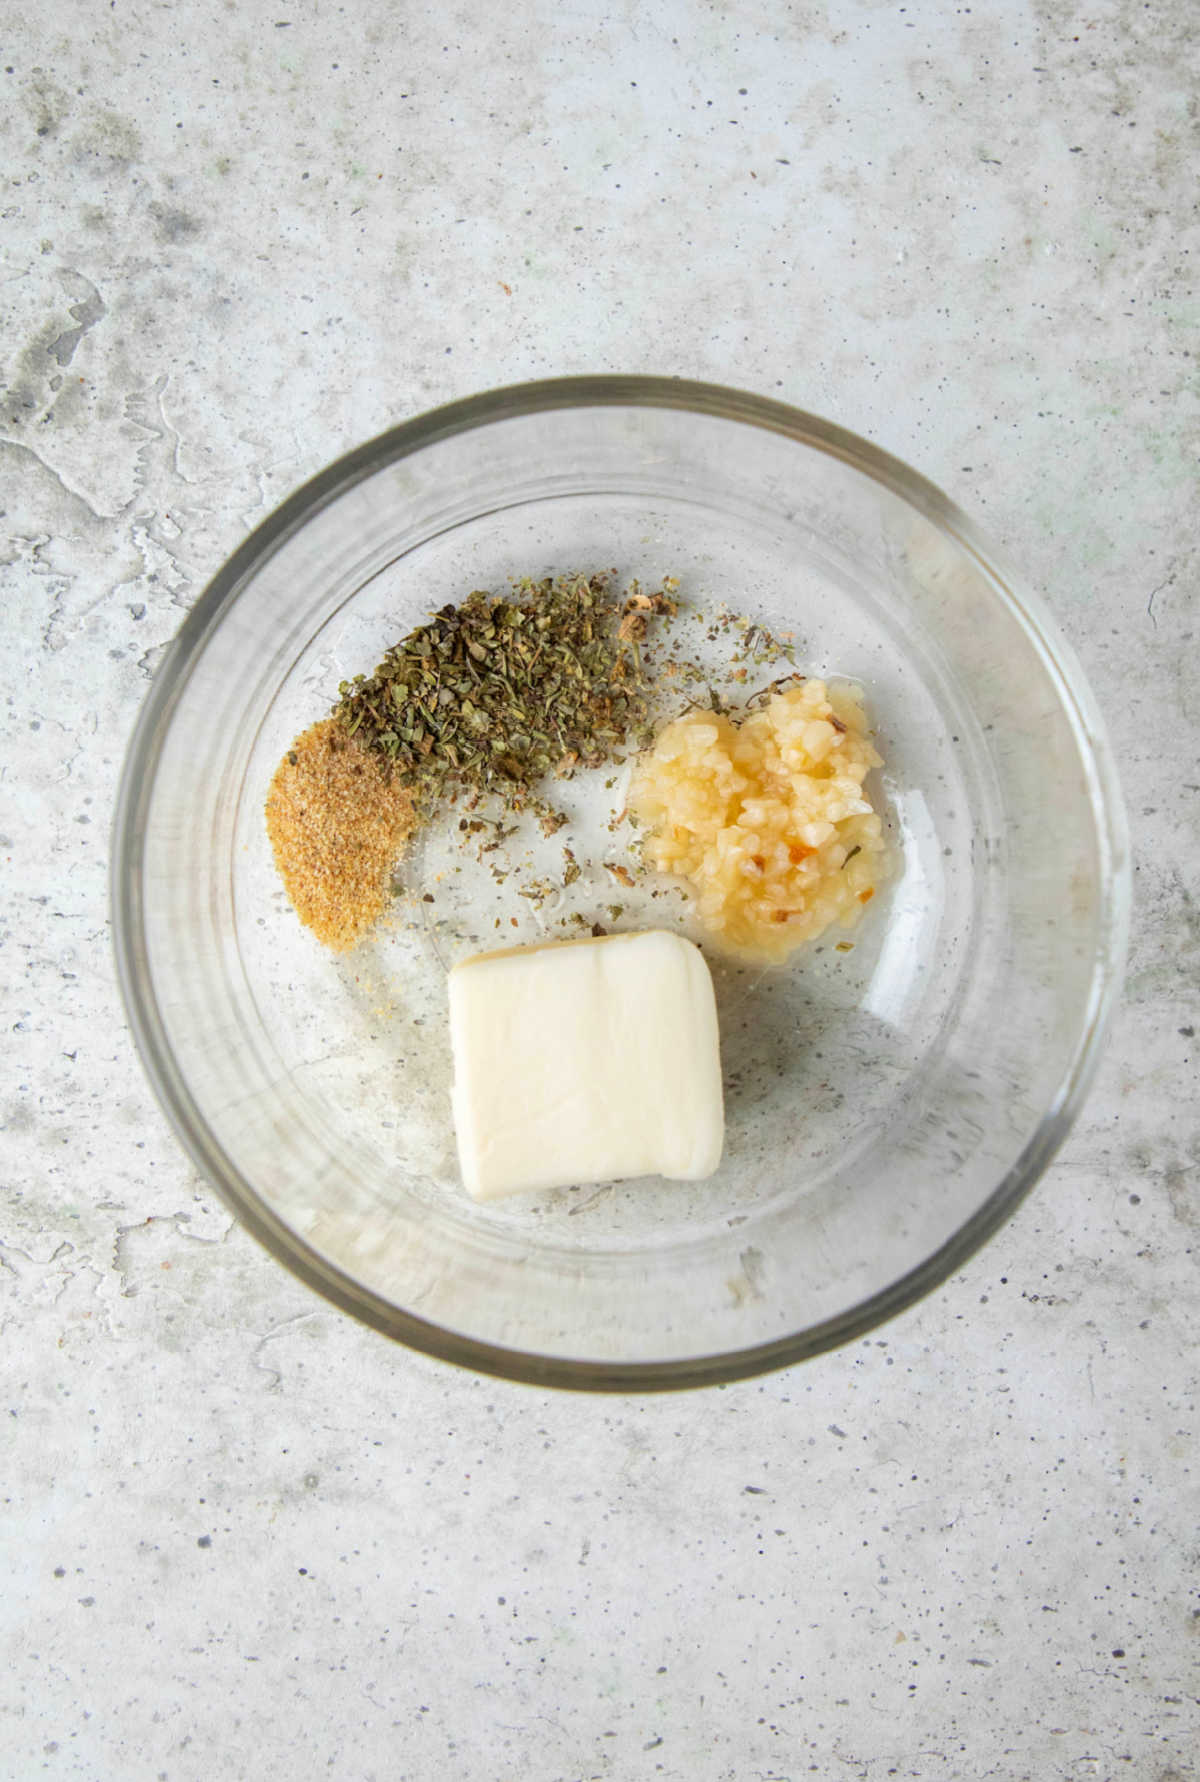
Step 8: In a small bowl, stir together ingredients for garlic butter.
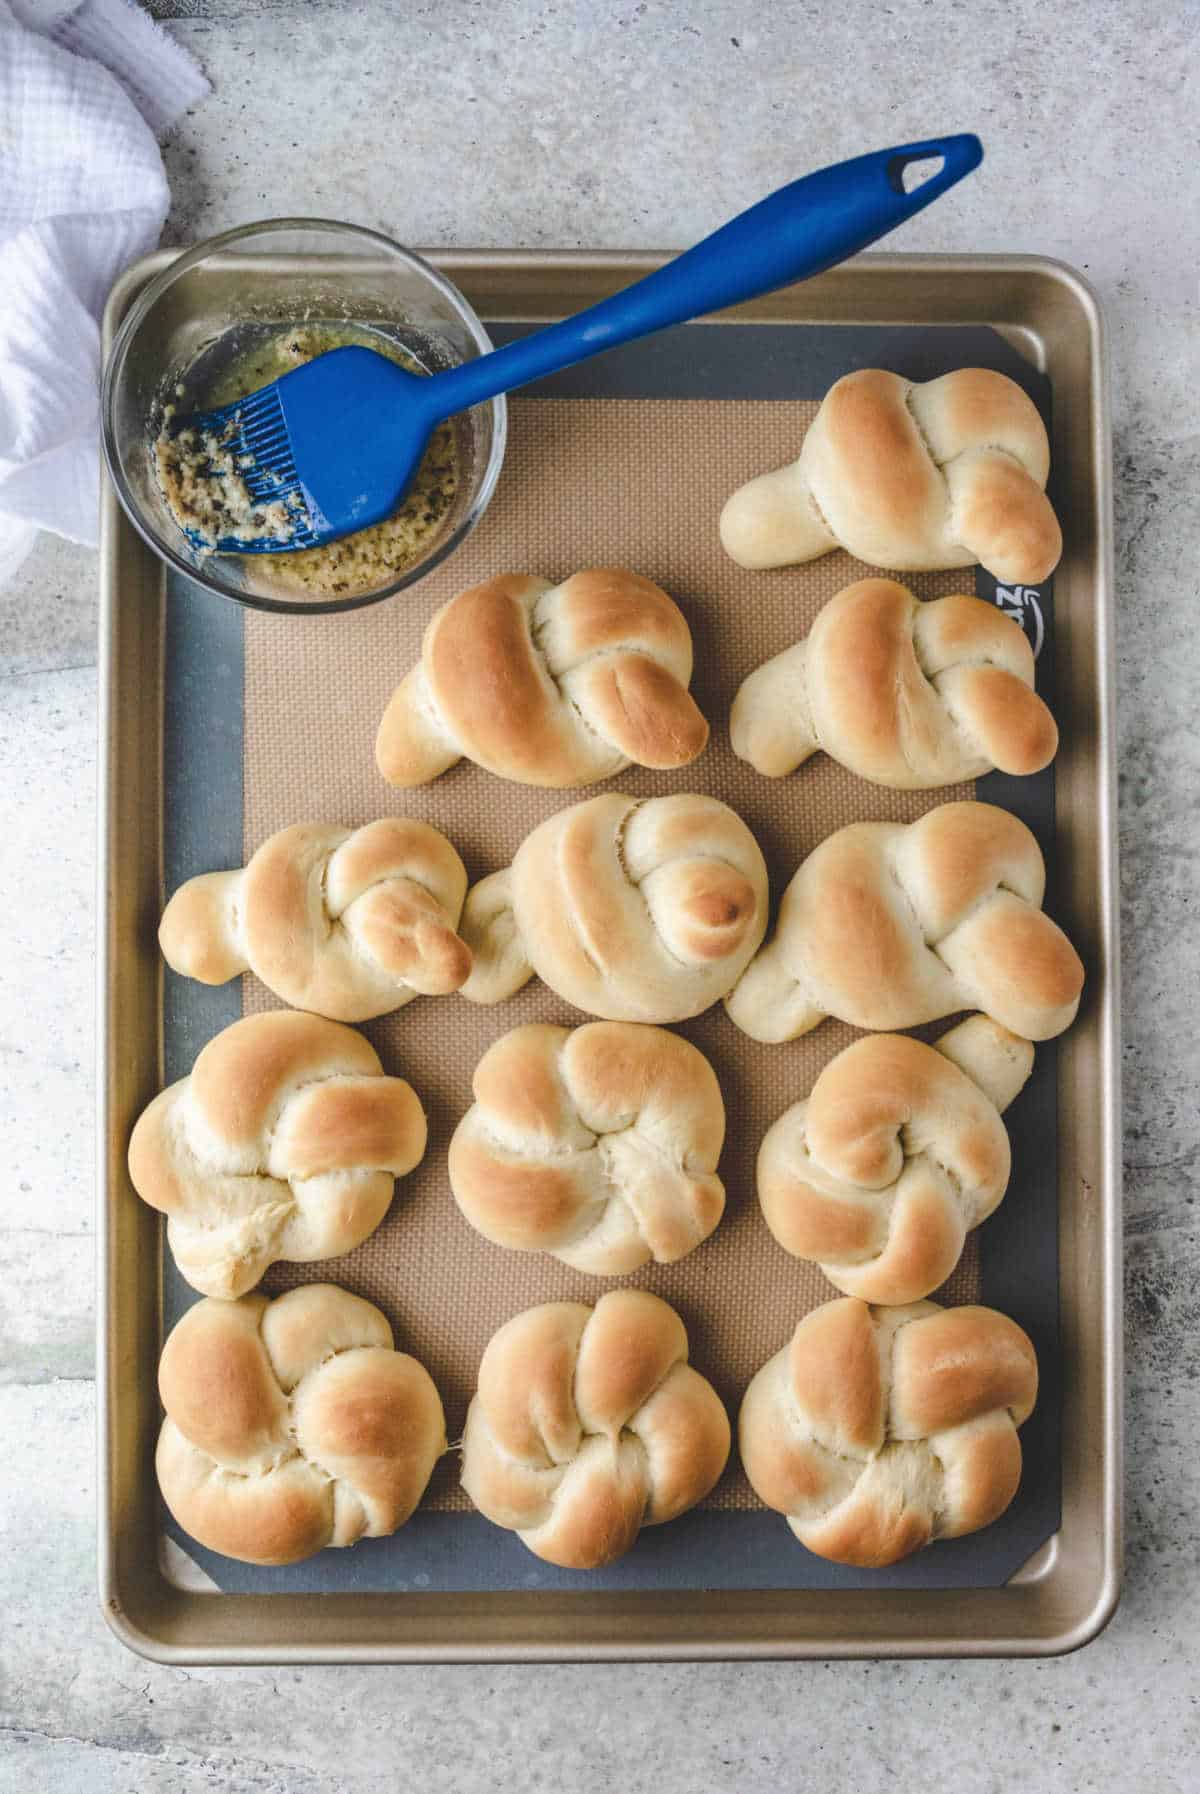
Step 9: After removing the rolls from the oven, brush with garlic butter, sprinkle with cheese if using, and enjoy!

How to tie knots
The knots can be either tied into into a simple knot or shaped into a fancier knot.
Simple knot
To form a simple knot, roll the dough into strips that are about 6 inches long. Tie the strip into a loose knot and place on the baking sheet.
Fancy knot
To form a fancy knot, roll the dough into a strip that’s about 6 inches long.
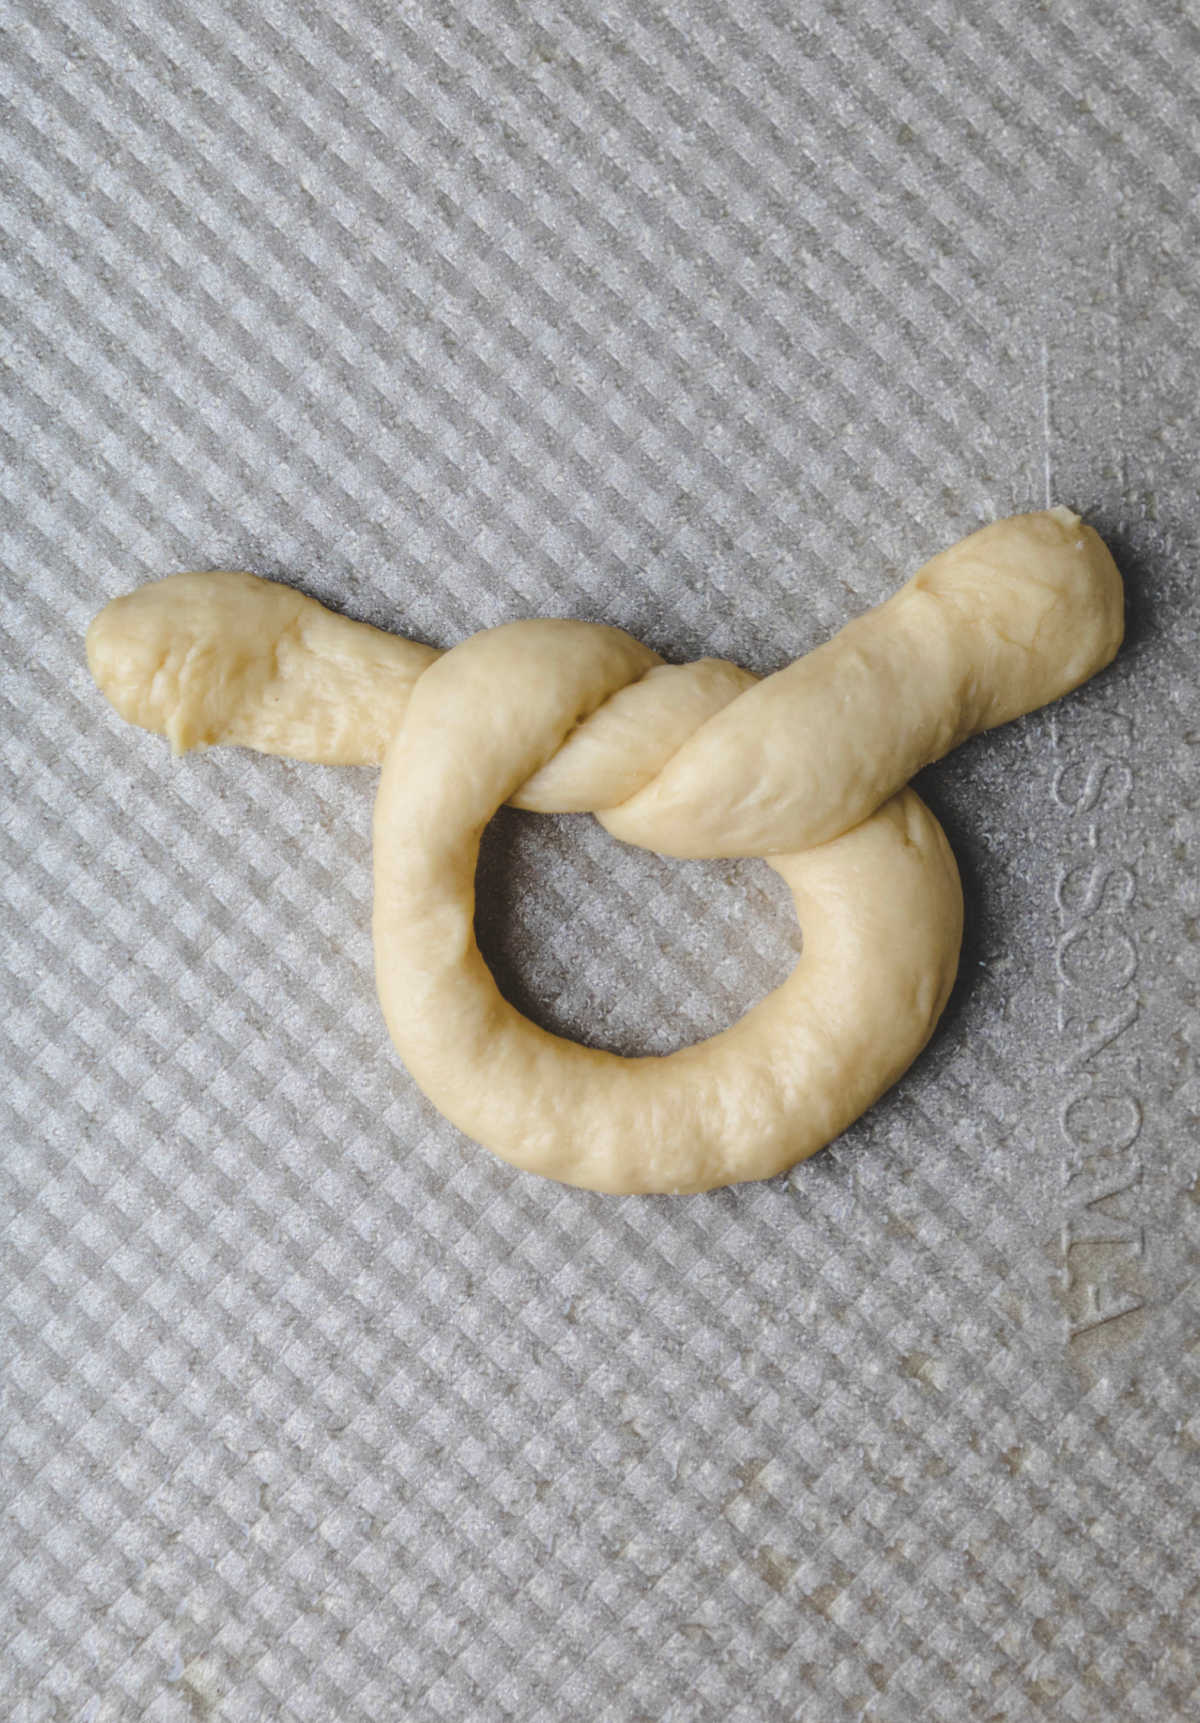
Tie the dough into a knot leaving the middle open and the ends long.
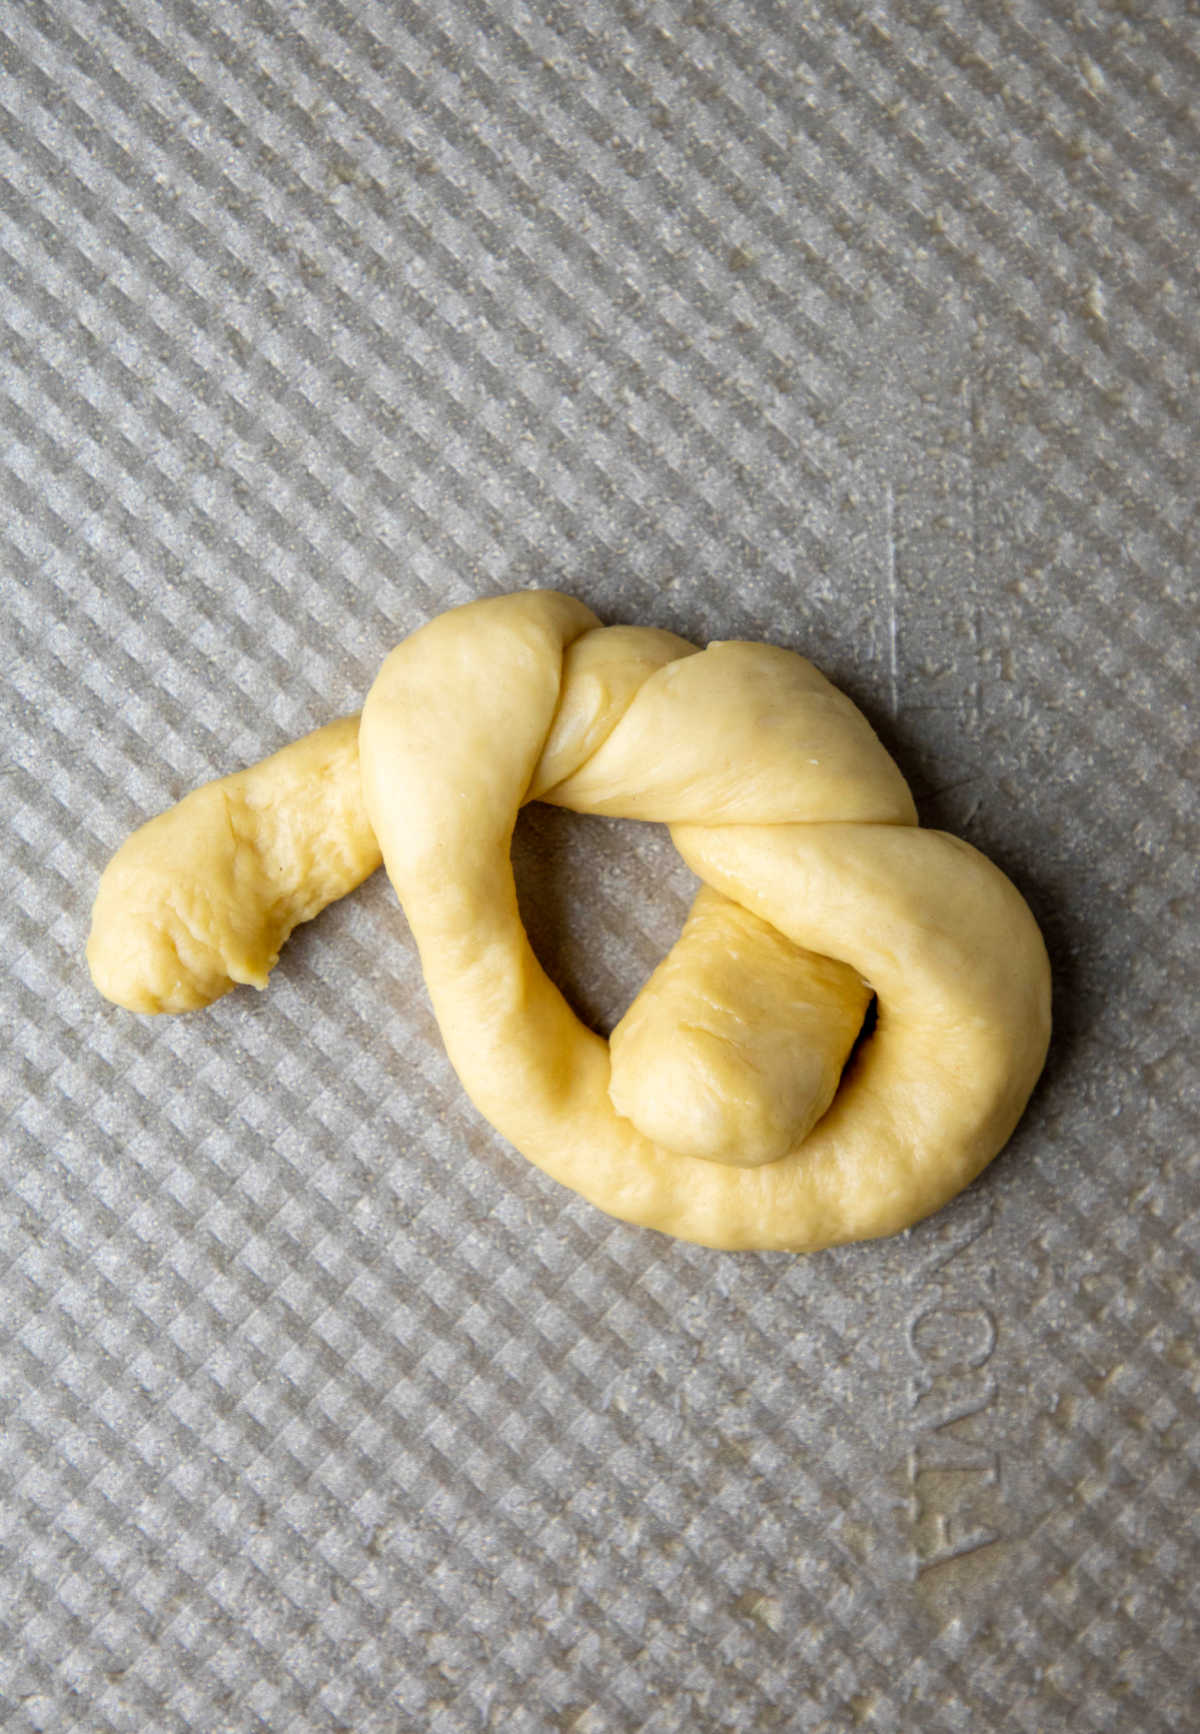
Pull one end underneath the dough into the center. Pull the other end over the dough.
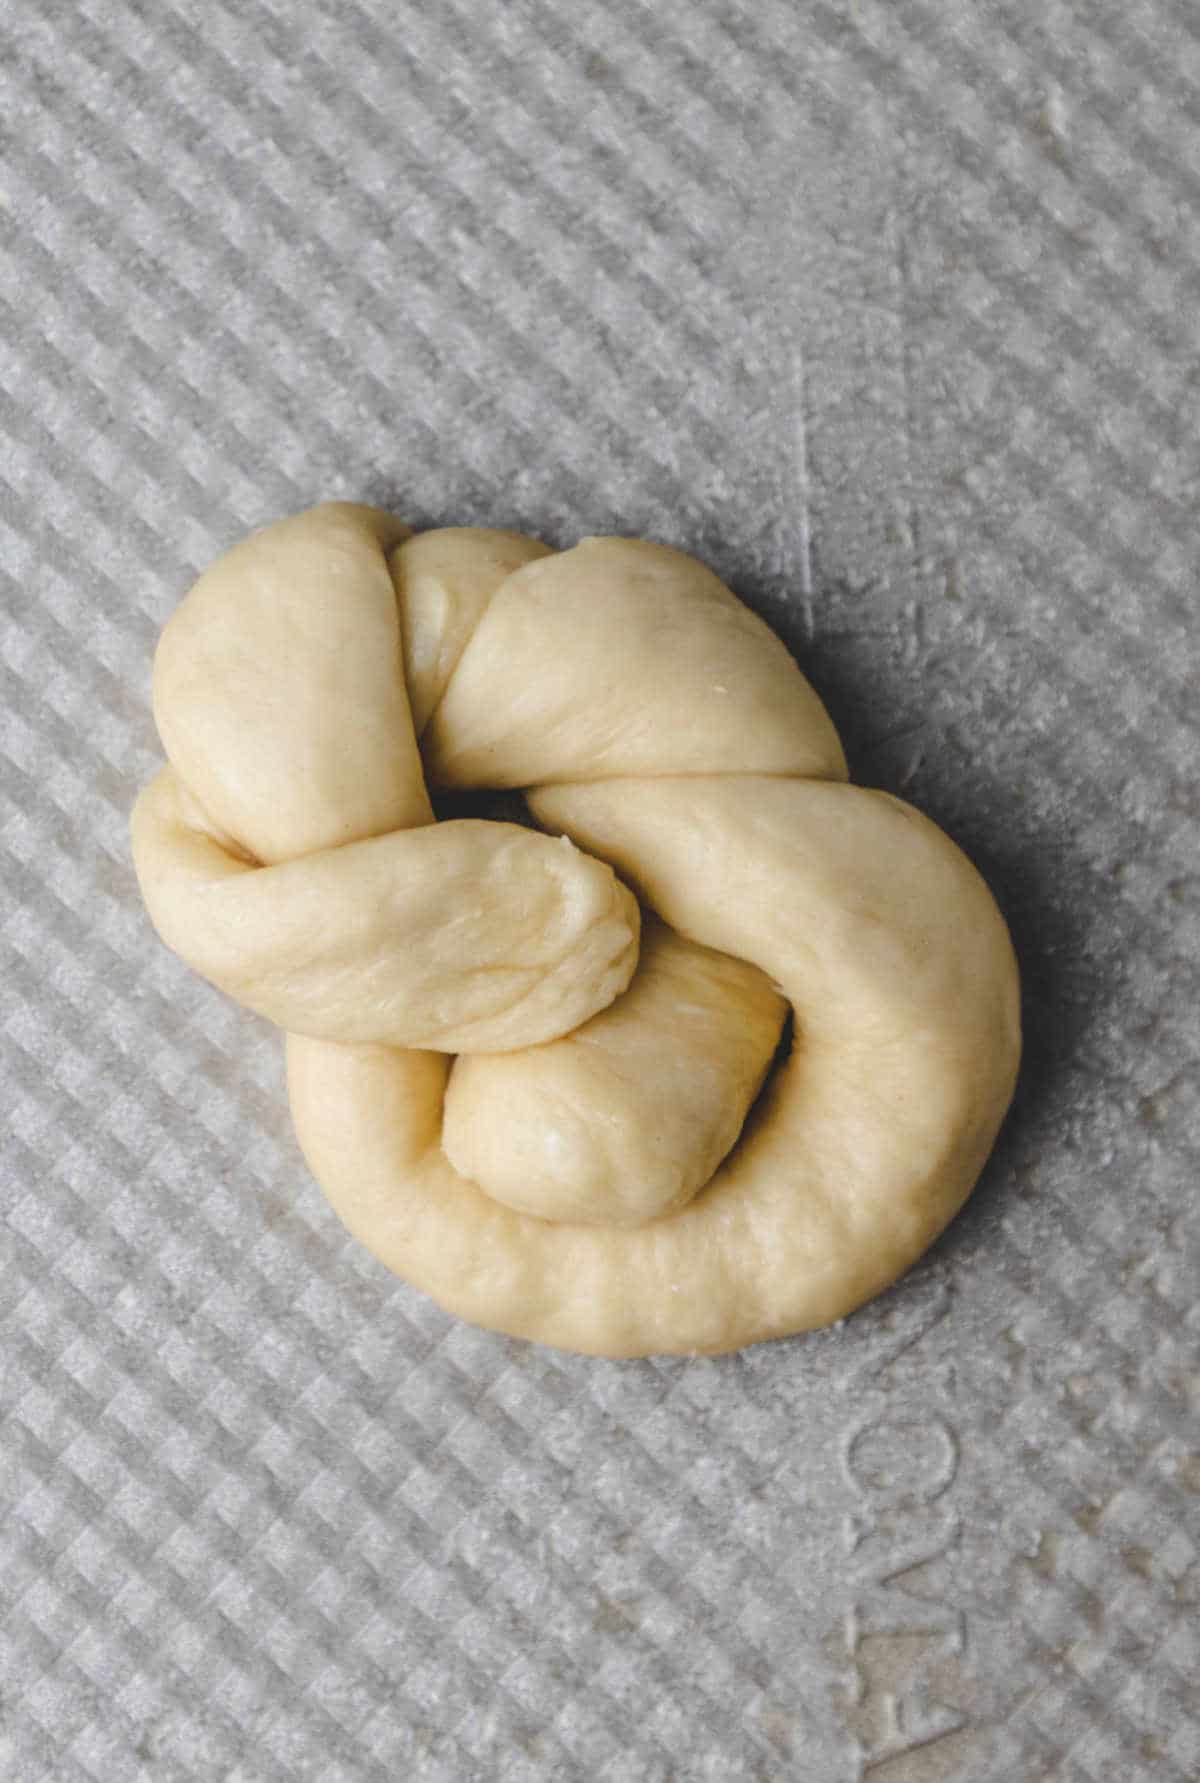
Press the two ends together to seal them. Then flip the garlic knot over and place it end side down on the baking sheet.

FAQs
You can! Just use an equal amount of active dry yeast. After step 5, let the yeast mixture sit for 5-10 minutes or until foamy. Then continue with the recipe as-written.
I recommend storing the leftover garlic knots in an airtight container.
Garlic knots are best eaten just after they’re made. They will keep for 2-3 days when properly stored.
Absolutely! If you want more garlic butter, simply double the garlic butter ingredients.
More easy bread recipes!
If you’ve tried this homemade garlic knot recipe, don’t forget to rate the recipe and leave me a comment below. I love to hear from people who’ve made my recipes!
You can subscribe to receive my latest recipe newsletters or follow me on Facebook, Instagram and Pinterest for even more delicious food.

Homemade Garlic Knots
Ingredients
Garlic Knots
- ¼ cup butter
- 1 cup milk
- 2 tablespoons instant yeast
- 1 tablespoon honey
- ½ teaspoon salt
- 1 large egg
- 3-3 ½ cups all-purpose flour
Garlic Butter
- 2 tablespoons butter
- 2 cloves garlic minced
- ½ teaspoon Italian seasoning
- ¼ teaspoon garlic powder
- 3-4 tablespoons grated Parmesan or Romano cheese optional
Instructions
- Preheat oven to 400 Line a 9×13-inch rimmed cookie sheet with parchment paper or a silicone baking liner. Set aside.
- In a small saucepan, melt butter.¼ cup butter
- When butter is mostly melted, stir in milk, and heat mixture to 100-110 F.1 cup milk
- Meanwhile, add yeast and honey to the bowl of a stand mixer fitted with a paddle attachment (or a large mixing bowl if mixing by hand).2 tablespoons instant yeast, 1 tablespoon honey
- When milk mixture is at temperature, add to yeast and honey; stir to combine.
- Add salt and egg, and stir until combined.½ teaspoon salt, 1 large egg
- Stir in 2 ½ cups of flour.3-3 ½ cups all-purpose flour
- Add remaining flour until dough clings to paddle and cleans the sides of the bowl.
- Switch to the dough hook, and knead for 2 minutes (or by hand for about 5 minutes).
- With lightly floured hands, shape dough into 12 knots, and place dough on prepared baking sheet.
- Cover, and let dough rest for 10 minutes.
- Bake for about 9-12 minutes, or until lightly golden brown.
- While the knots are baking, prepare the garlic butter.
- In a small bowl, stir together ingredients for garlic butter.2 tablespoons butter, 2 cloves garlic, ½ teaspoon Italian seasoning, ¼ teaspoon garlic powder
- After removing the rolls from the oven, brush with garlic butter, sprinkle with cheese if using, and enjoy!3-4 tablespoons grated Parmesan or Romano cheese
Video
Notes
- Butter – I use salted butter in both the dough and the garlic butter topping. If using unsalted butter, increase the salt to 3/4 teaspoon in the dough and add a pinch or two to the garlic butter.
- Milk – I like to use 2% milk. Using skim milk will give you a leaner dough and using whole milk will give you a slightly softer, richer dough.
- Instant yeast – You can also use active dry yeast. Just use an equal amount of active dry yeast. After step 5, let the yeast mixture sit for 5-10 minutes or until foamy. Then continue with the recipe as-written.
- Garlic powder – Be sure to use garlic powder, not garlic salt.
- Parmesan cheese – The cheese is optional. Feel free to omit it if you prefer.
- Nutrition facts have been estimated.
Nutrition
Did You Make This Recipe?
Share it with me on Instagram @i_heart_eating and follow on Youtube @katedean and Pinterest @katedean for more!
Originally published 1/6/14. Updated with new photos on 10/5/19. Updated again on 1/3/22 with additional photos, tips, and information.
Reader Interactions
Love this recipe?
Share your thoughts below and let’s chat! Make sure to connect with me on your favorite social platform below and show me what you made!


Comments & Reviews
Kim says
I don’t make alot of rolls, these were so good! They were easy and tasted better than takeout. Thanks!
Kate says
Thank you! I’m glad you liked them! Thanks for commenting! =)
Lisa says
I made these rolls for a family get together and they were delicious. We have had a day of INTENSE thunderstorms here in Texas and my mom used to caution me about making bread on bad weather days. Indeed, I have had problems with bread not wanting to rise on rainy days. I think the fast-rise yeast of this recipe helped because these beauties were perfect! My grandchildren barely let them cool before they gave their two thumbs up review. Tomorrow I’m making your cinnamon knots. Thank you so much for posting this recipe…my family loves them.
Kate says
I’m so glad!! It makes me so happy to hear that people are enjoying my recipes! Thank you for taking the time to comment, and I hope you enjoy the cinnamon knots, too!
Erin says
These are fantastic! I’ve made them twice now, using the tip for active dry yeast, and they’ve been perfect each time. Mia fit a great, fast roll recipe!
Kate says
Thank you so much! I’m glad that you liked them and that you found that tip helpful! Thank you for taking the time to leave a comment! =)
April says
Great recipe… I was a little hesitant when I was adding 2 packets of yeast. So glad I did. I didn’t change a thing and can’t wait to make the cinnamon ones! Thank you so much for a definite keeper!
Kate says
Thanks! I’m so glad that you liked them! Thank you for taking the time to come back and leave a comment! =)
Wendy Klik says
HI Kate,
Just wanted to stop by and thank you for this recipe. I am featuring it on my blog today, they turned out perfectly.
Kate says
Glad you enjoyed them!
Jaunita says
Hello Kate, thank you for posting garlic knots recipe, one am looking for also please let know 2T. yeast refers to tablespoons or teaspoons ?
Kate says
2 T. is 2 tablespoons. If you have any other questions, please feel free to ask!
Megan Gianniny says
When you say the “paddle attachment” on the mixer, do you mean the flat beater or the dough hook (or something else)? I just got a Kitchen Aid for Christmas and I’m looking for some recipes to make!
Kate says
Yep! The flat beater is the paddle attachment. It’s great for the beginning stages of mixing the dough before you switch to the dough hook to knead the dough. Yay for a Kitchen Aid!! I got my first one when I got married almost 8 years ago. I use it so much that I got a second one a couple years ago.
I’m not much of a frosting person, but Whipped Buttercream Frosting is one of my faves and works beautifully when it’s whipped up with a Kitchen Aid. Another recipe that works really well with the Kitchen Aid is this Brownie Cookie recipe. =)
Deanna says
Hi,
I have a couple of questions regarding the butter. The units for the amount of butter and the cheese are not on the recipe. I am assuming two sticks of butter and 3-4 Tbsp of cheese but want to make sure.
Deanna
Kate says
Hi! Thanks for the heads up! Some of my recipes were reformatted during an update, and those amounts were taken out somehow. For the butter, it should be 2 tablespoons, and the cheese should be 3-4 tablespoons. Thanks again! =)
Shawna says
These are so good! And actually only took me 30 minutes. Well, a little longer because I misread when I was supposed to let the dough rest for 10 minutes so it ended up rising both before and after I shaped the knots. They ended up super big and fluffy which my husband says threw off the garlic butter to bread ratio. :) So I will definitely be making these again, a little smaller. But they were so pretty! Thank you!
Kate says
I’m so glad you both liked them! That’s so funny! The right garlic butter to bread ratio makes all the difference.;) Thank you for taking the time to come back and leave a comment!
Dawn (Nana) says
Hi, these look delicious and easy, so I’m going to try them. Would you be able to explain or illustrate how you make the knots? I’ve been looking at the pictures carefully, but can’t tell where the ends are. Do you roll the dough into long strings, fold in half and then tie a knot? Then tuck in the ends? Thanks!
Kate says
Yes, that’s what I do. I hope this makes sense! I roll the dough out in my hands like I’m making a clay snake (about 8 or so inches). Then I tie the dough in a knot. I then take the ends and tuck them in underneath. If you have other questions about it, please let me know!
Janette says
garlic knots are one of my favorite things in the world! I’m totally making these asap! Thanks for sharing!
Kate says
I make these all the time. I hope you enjoy them as much as we do! =)
Nicole says
I tried these, and they came out very dense. Did I do something wrong? Over knead them perhaps?
Kate says
Maybe? It may have been that. Usually when I’ve had rolls come out really dense it’s either been because there was too much flour in them or because the yeast didn’t activate and so they didn’t rise.
I’m happy to help you try to troubleshoot if you have more questions!
Katie says
Can you give me instructions for shaping the dough into the knots? I have no clue how to do it!
Kate says
Absolutely! Just take your piece of dough, and roll it like you’re making a clay snake. You’ll want it to be about 6 inches long. Then, take it and tie it into a knot. Then I take each end and tuck them into the middle on the bottom side of the knot.
I hope that all makes sense! If not, please feel free let me know if you have more questions.
Janei says
Thank you for sharing this fabulous recipe! I’m so glad I found you on pinterest; my family LOVED these. I’ll be trying more of your recipes. Thanks again!
Kate says
I’m so happy that you and your family liked it! Thanks for taking the time to come back and leave a comment!! =)
Estelle says
I just happened to stumble upon your site with the garlic knots recipe looking straight at me and I was so thrilled! I have been looking for bread-type recipes such as yours for the longest time and when I’d find any and tried them, they just didn’t have much flavor to them. Yesterday my husband bought me my very first KitchenAid stand mixer and guess what I made first with my new mixer…lol! Of course the garlic knots. I even doubled the recipe and they were just “to die for” and everyone loved them. The leftovers were gone before noon today! Today I made your soft and big dinner rolls and they were just as awesome! Anyway, it’s only been two days since I found your site so I will continue to try out many more of your recipes. They all just look wonderful. Thank you so much for sharing your recipes and please continue the great job you do. God bless!
Kate says
Oh! I’m so glad that you enjoyed the garlic knots and the rolls! Thank you so much for taking the time to leave such a nice comment! =)
PS – Congrats on your KitchenAid, too! I love mine; it makes baking so much easier.
Jocelyn says
These are terrific! They come together very fast and rise beautifully. Thanks so much.
Jillene@inkhappi says
These look wonderful and do-able! I am glad I found your site. I like what I see. A new follower!
Kate says
Thanks so much!! I’m glad you found it, too!! Thanks for following! =)
Stephenie says
I was wanting to use active dry yeast. Would I still need to melt the butter and heat it with the milk? I’m learning how to make breads and wanted further directions, since this sounds like a great recipe. Thanks
Kate says
Sure! It’s awesome that you’re learning how to make bread. To use active dry yeast, you would still melt the butter and milk. You would just substitute in an equal amount of active dry yeast. Then, you would need to let the milk/yeast mixture sit for about 5-10 minutes, or until it looks foamy. When you use active dry yeast, as opposed to instant yeast, you have to give it a few minutes to start working before you continue with the recipe (that step is called proofing the yeast). If you have any other questions, just let me know!
Deb@CookingOnTheFrontBurner says
Thanks for linking these up to Marvelous Monday – I love the ease of making these – plus they are pretty looking! pinning!
Kate says
Thanks!! =)
Jen says
I’m stoked that I came across your blog. These garlic knots sound delicious and your photography is beautiful as well :-)
Kate says
Thanks so much!! That is so nice of you! =)
Cheryl says
Question: Do I have to use honey??? I don’t like the taste of it at all! Just wondering, thank you :)
Kate says
No, you don’t have to use honey. You can’t taste it, but I know sometimes just knowing that something is in a recipe is too much. You can substitute 1 1/2-tablespoons of granulated sugar instead. =)